A Complete Guide to Understand Damage Stability Better
Have you been breaking your head to understand damage stability?
Not only this topic is difficult to understand, it is boring too. I know and I understand.
But boring topic cannot be the explanation of not knowing what we ought to know in the real world, on the high seas.
In 2010, Paris MOU and Black Sea MOU carried out a concentrated inspection campaign on tanker damage stability.
At the end of this campaign, Pat Dolby, co-ordinator of this CIC commented,
The most significant finding from the campaign was that 16.2% of tankers that were inspected, the master could not demonstrate that the ship was complying with damage stability.
16.2%. That is a huge number that definitely shows that there is a void in understanding this topic.
So today, let us discuss and demystify this topic of damage stability.
Why damage stability?
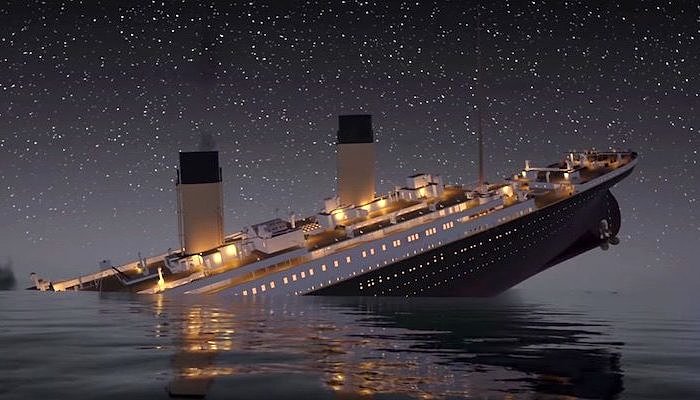
Do you remember that scene from the movie “Titanic”, where after the ship hit the iceberg, the naval architect lays down the ship’s plans in front of the captain?
While he was trying to brief the captain about the situation, the captain just had this one question.
How much time do we have?

And he said, an hour, two at the most.
How did he arrive at this number and how was he sure that an unsinkable ship is going to sink?
I will answer that question later but that is what damage stability is all about. All we are interested in is knowing that after an incident if the ship will remain afloat or sink?
All the rules about damage stability are trying to keep the ships safe even after one or more compartments are breached.
Consider this.
You have two ships both identical in every respect but the first one has only one tank (or cargo hold) and the second one has two tanks (or cargo holds).
Which one do you think is safer? Easy answer, right?
The one with the two cargo tanks.
This is because if one compartment is flooded, the first ship will have 100% of the cargo space flooded. The second ship would still have 50% of the cargo space intact.
What I am trying to prove here is that more the subdivisions of the ship, safer it would be.
But the ship owners cannot divide the cargo spaces in 20 or 50 compartments. This would mean the use of more steel, more money to build the ship and lesser cargo space to use.
Shipowner cannot build a ship with just one compartment either. That is too unsafe.
So how many minimum subdivisions a ship must have?
All in all, there are three approaches to building a ship that can withstand damage to its compartments.
All the three approaches for damage stability are just aiming to find that answer. So let us discuss each of these approaches of damage stability.
1. Floodable length and factor of subdivision
This is an old approach but it is still important to discuss this because this approach lays the foundation to understand damage stability.
In this approach, the number of subdivisions required is calculated by knowing the floodable length along the ship.
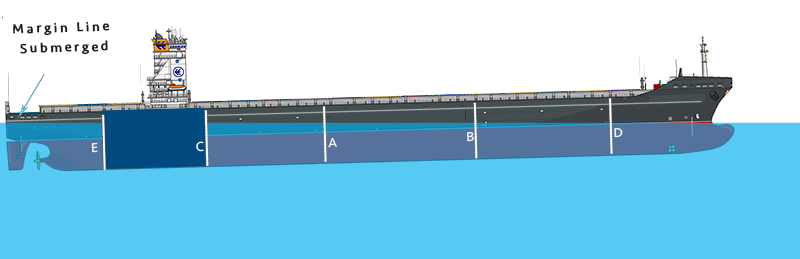
Floodable length is the length of the compartment which if flooded will cause the ship to sink up to the margin line.
Let us understand this by building a ship.
We have a ship and we need to put subdivisions (bulkheads) to it to divide the ship into compartments.
We create one compartment in the midship by placing two bulkheads (let us mark this bulkhead as A & B).
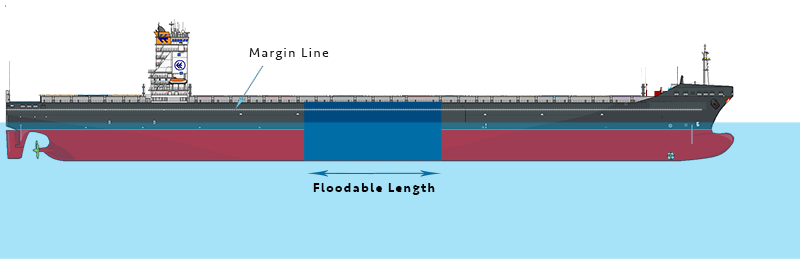
The length of this compartment (Length AB) need to such that if this compartment is flooded, the ship will sink to a point where margin line is just submerged.
This is the floodable length at this point.
Now we want to place another bulkhead aft of midship. Again this bulkhead needs to be at a location (C) such that if compartment AC is flooded, the ship will sink to a point where margin line is just submerged.
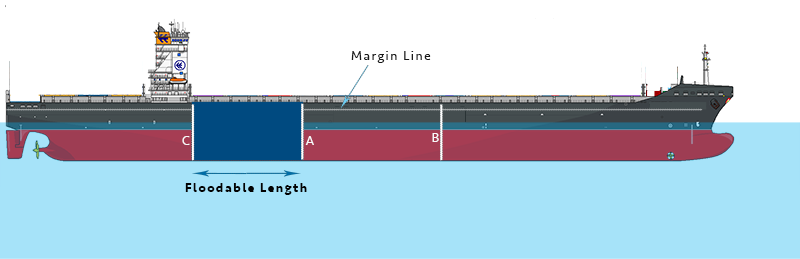
And with this same approach, we can decide the location of other bulkheads along the ship’s length.
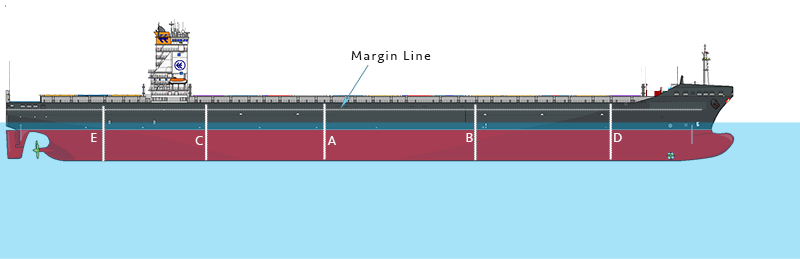
When calculating the floodable length, One thing that we need to keep in mind is that we need to flood the compartment to the full width of the ship even when we have or plan to have a centerline bulkhead.
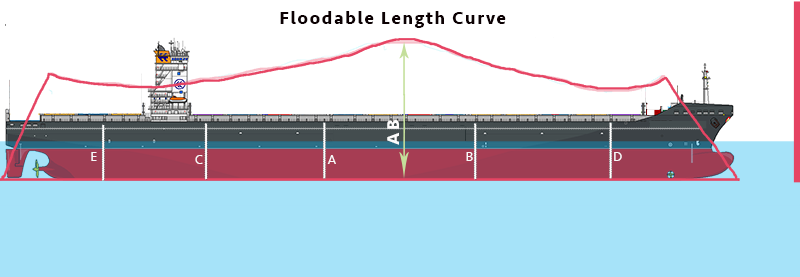
Floodable length Curve
Our ship is ready now with all the compartments it needs. This ship would not sink if any one compartment is breached and flooded.
But if you would have noticed I have drawn larger compartment in the midship area. This means that I have shown large floodable length closer to the midship area.
This is because if the midship compartment is flooded, the ship will sink bodily (with least trim).
But as we move away from the midship, the flooded compartment will trim the vessel. This would make a smaller compartment to sink the ship up to the margin line.
So the bottom line is that the floodable length changes along the length of the ship.
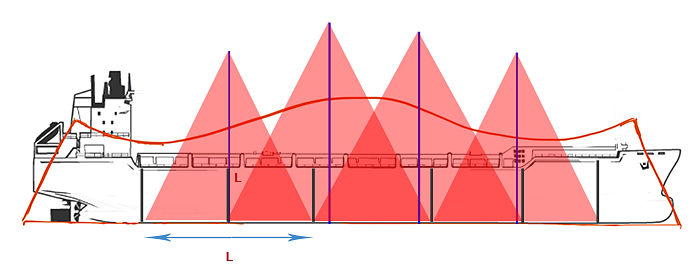
Floodable length curve represents the maximum floodable length of the ship along the ship’s length. This curve is obtained by vertically plotting the floodable length along the ship’s length.
Checking the damage stability compliance: Floodable curve method
So far I have given the basic idea of what floodable length is and how floodable length curve is obtained.
Ships, that are required to comply with this method of damage stability would be provided with the floodable length curve.
The damage stability rules for the ships would be something like…
The ship should be able to survive the breach (flooding) of any one (two or three) compartment.
To check if the ship would comply with this damage stability requirement, the floodable length curve is superimposed on the ship’s plan.
Then one compartment by one, the damage stability compliance is checked. The length of the assumed damaged compartment is plotted vertically at the center of the compartment.
If this length is below the floodable length curve, this compartment complies with the damage stability requirements of one compartment standard.
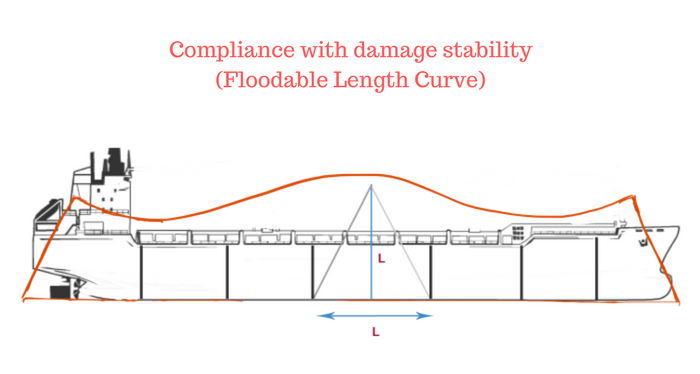
Same is done with other compartments.

As we can see, all the length triangles are within the floodable length curve of the ship. This means that this ship complies with one compartment standards of the damage stability.
Now let us check the damage stability compliance for two compartment standard. In this case, we will assume the flooding of two compartments and compare the length triangle with the floodable length curve of the ship.
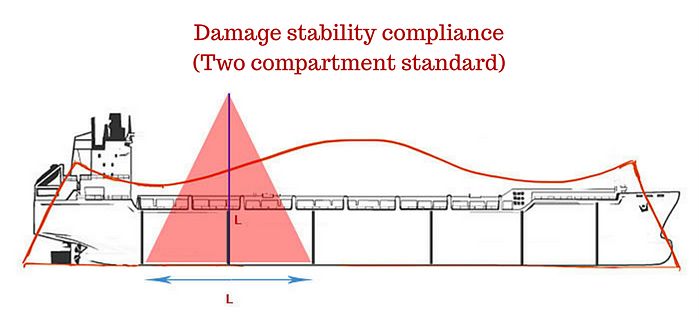
Again same is done assuming flooding of any two adjacent compartments.
Clearly, this ship does not comply with damage stability requirements of two compartment standards.
If we need to comply with two compartment standards, this ship needs to have more compartments, the length of which need to be such that even when two compartments are flooded it will be below the floodable length curve.
Maybe the below subdivision of the ship will be able to satisfy the damage stability requirement for two compartment standard.
Let us check the damage stability compliance to two compartment standard.
As you can see, this ship is a two compartment standard ship now.
We can go on in a similar way if we want to build a three compartment or four compartment ship.
Remember, Titanic was a four compartment ship and so was called the unsinkable ship.
Finally, if you are still unsure of this concept, watch this video.
2. Damage stability: Probabilistic damage assessment
Damage stability calculations by probabilistic damage assessment is required by SOLAS Chapter II-1, part B. This is required for cargo ships 80 m in length and upwards and to all passenger ships regardless of length.
This approach uses the concept of probability to ensure that ships can survive damage to its compartment(s).
There are two probability factors that are used in this approach.
- Probability that a particular compartment(s) will damage in an incident (factor “p”)
- the probability that ship will survive if that compartment(s) is flooded (Factor “s”)
Used as the requirement for the cargo ships and passenger ships.
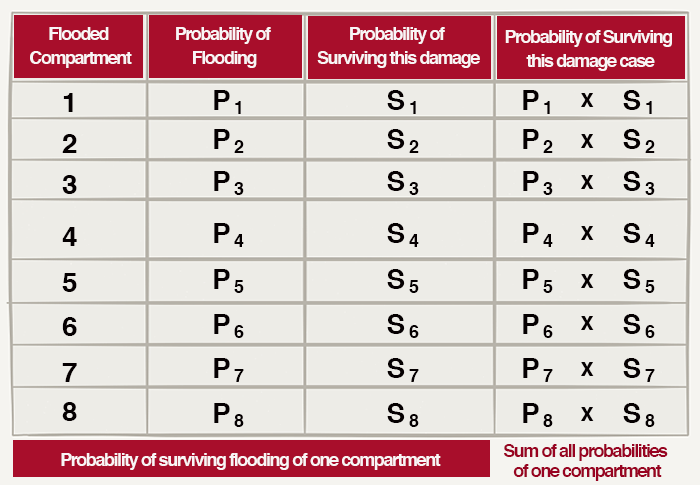
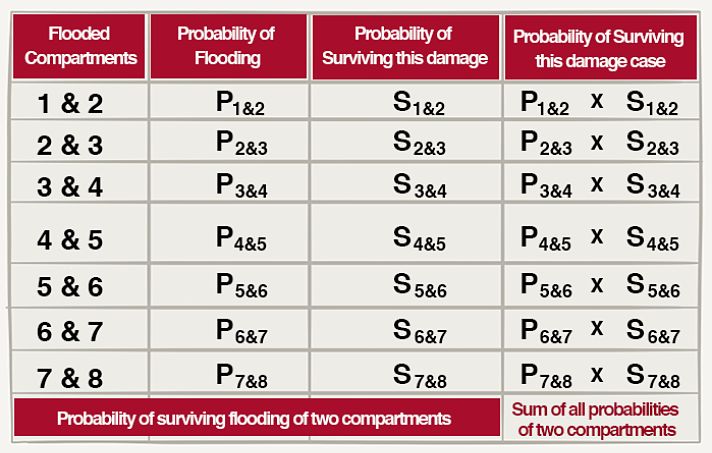
Multiplying these two factors (p x s) will give the probability of surviving that damage case.
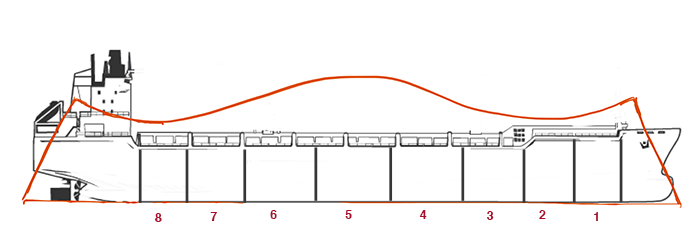
Let us again take our 8 compartment ship and calculate the probability of surviving damage to one compartment.
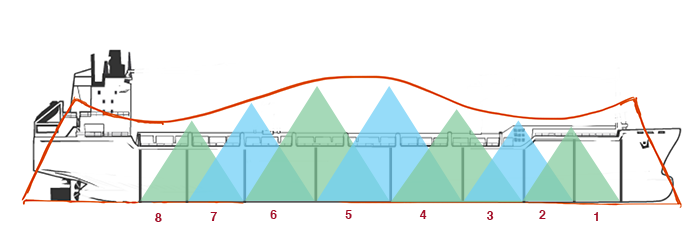
Now we need to calculate the probability of surviving two compartment damage.
While it may seem repetitive but let us also calculate the probability of surviving three compartment damage.
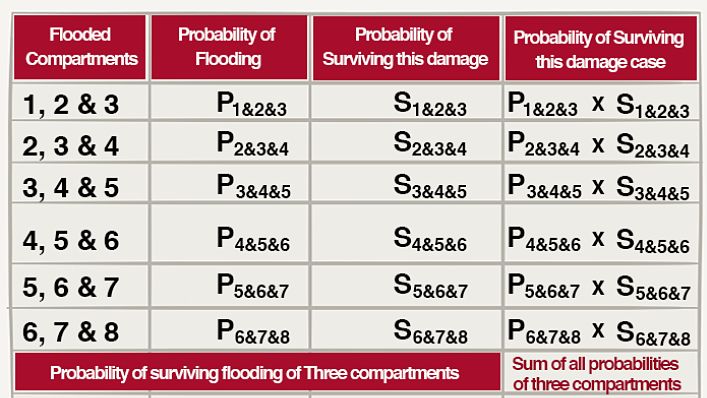
The value of S in all these will either be 0 or 1. This is because when we have considered a damage, the ship will either survive (probability 1) or not survive (probability 0).
So if this ship is three compartment ship, there is no need to consider the probability of survival for four and more compartments because it will be zero.
But there is still one thing to consider. At what drafts we need to consider all these damages?
SOLAS requires that these should be considered at three drafts.
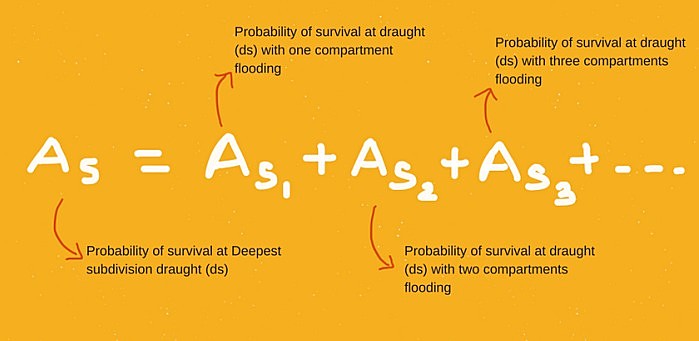
- Deepest subdivision draught (ds): Which corresponds to the Summer Load Line draught of the ship.
- Light service draught (dl): Service draught corresponding to the lightest anticipated loading and associated tankage, including, however, such ballast as may be necessary for stability and/or immersion.
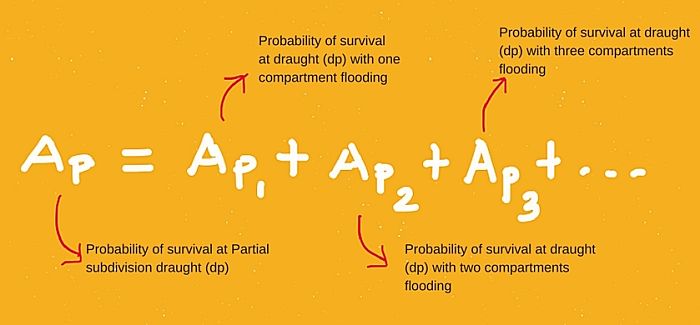
- Partial subdivision draught (dp): light service draught plus 60% of the difference between the light service draught and the deepest subdivision draught.
So, for example, all these three tables I made above need to be made for these three initial (before damage) drafts of the ship.
So for deepest subdivision draft we will have
For Light service draught (dl),

And finally, for partial subdivision draft, we will have
3. Damage stability compliance: Probabilistic method
Finally the bottom line. How would a ship comply with the damage stability requirements?
As per SOLAS Chapter II-1, part B-1, Regulation 6, the ship complies with damage stability when
Attained Subdivision Index > Required subdivision index
Attained Subdivision Index
As per SOLAS, attained subdivision index is calculated by the formula

Required Subdivision Index
SOLAS chapter II-1, Reg 7 gives the formula to calculate the required subdivision index for a ship.
These formulas are different for different type and size of the ship.
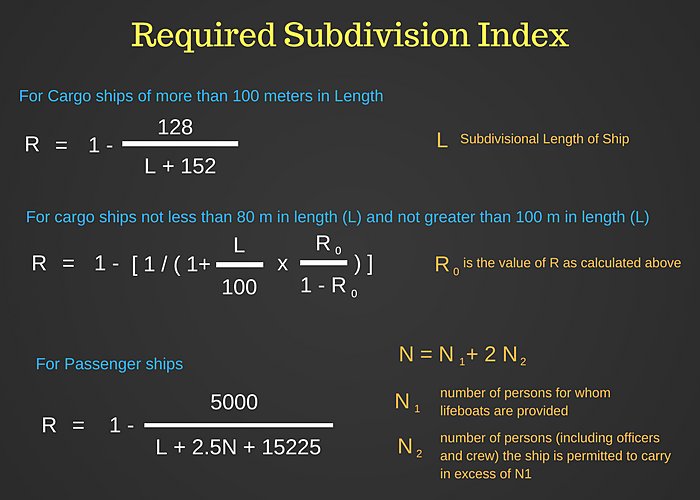
This would be the minimum required value of subdivision index.
If the actual value of subdivision index (Attained value) is less than the required, the subdivisions need to be re-arranged or increased to have attained subdivision index to be more than required subdivision index.
Damage stability by Deterministic damage assessment
Damage stability calculations by this method is required for all types of tankers.
Unlike probabilistic method that uses the concept of probability, the deterministic method defines the variables in quantifiable terms.
In this method,
- the damaged area is defined (damage assumption); and
- The minimum required value of the stability factors is defined (Survival requirements)
In all the cases of damage assumptions, the vessel should have the stability factors value more than the survival requirements.
Let us take the example of IBC code that sets the rules for the chemical tankers.
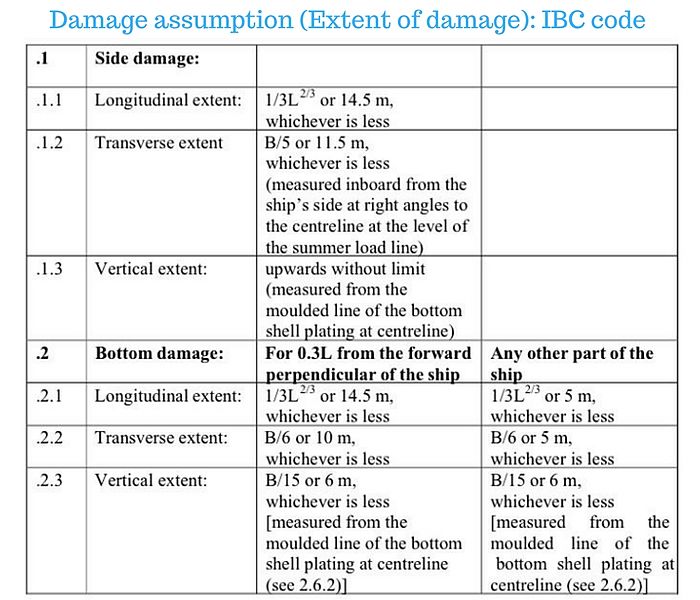
Damage assumptions as per IBC code are
1. Extent of damage
This defines the extent the hull of the chemical tanker needs to be assumed damaged.
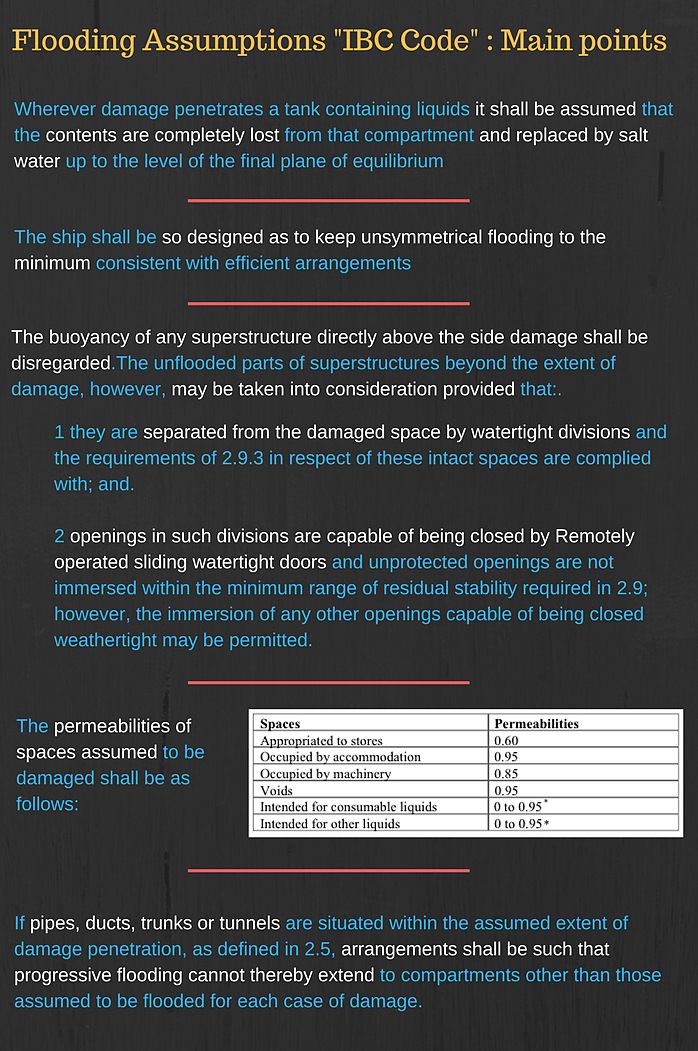
2. Flooding assumption
This defines the flooding assumptions that need to be considered after the assumed damage to the hull of the chemical tanker.
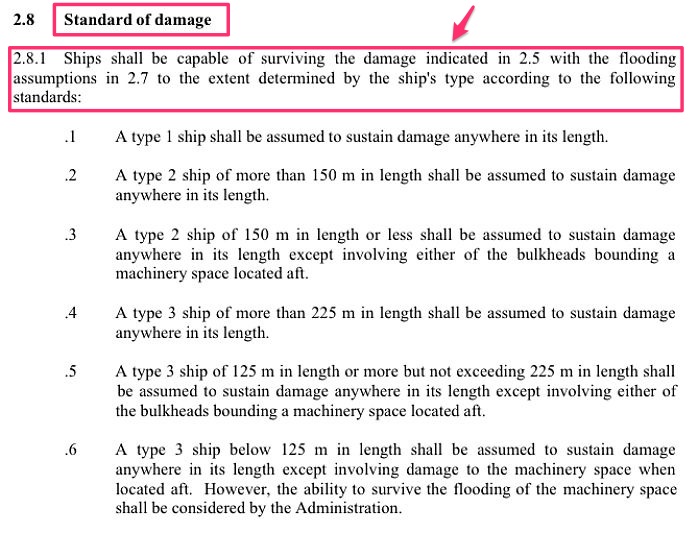
3. Standard of damage
The dimensions of assumed damage are considered in the “extent of damage” section. Standard of damage defines the assumed location of the damage along the ship’s length.
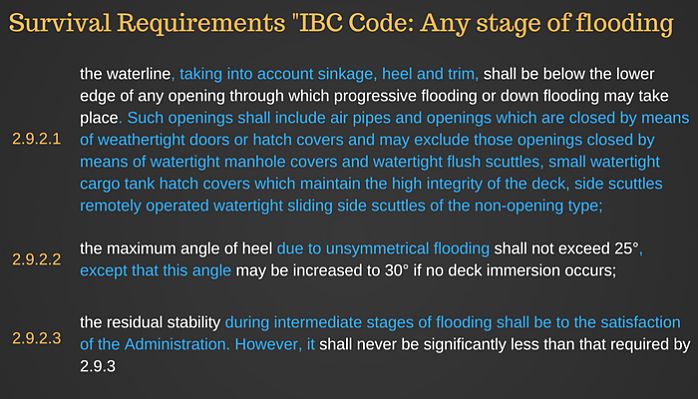
Survival Requirements as per IBC code
We have considered all the damage assumptions required as per IBC code.
In all the possible cases as per the damage assumptions, the ship should survive.
But in the deterministic approach, survival does not just mean that ship should not sink. The deterministic approach gives the minimum stability criteria values that the ship must have with assumed damage as defined.
As per IBC code, these survival requirements are for two phases of flooding.
- In any stage of flooding
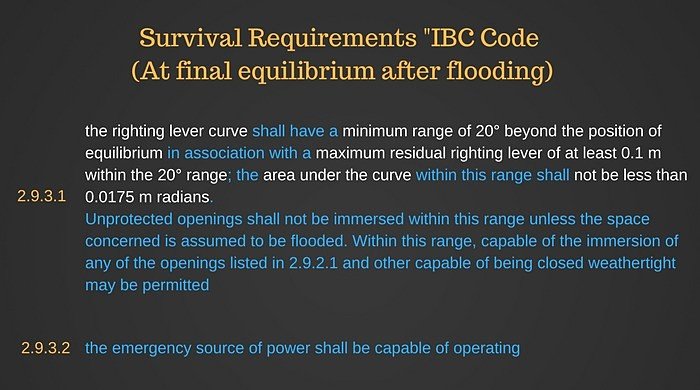
- At final equilibrium after flooding
In any stage of flooding
At final equilibrium after flooding
Damage stability compliance: Deterministic Approach
With probabilistic approach and floodable length curve, the damage stability compliance is dealt with at the stage of construction of the ship.
But ensuring compliance with the deterministic approach is different.
In the real world, there can be endless combinations of loading conditions of a ship. In each of these loading conditions, we need to apply the damage assumptions.
We then need to check if the survival requirements as defined by the IMO in various conventions are satisfied.
Off course, all these cases cannot be documented and checked during construction stages.
Instead, the damage stability criteria is checked for most probable loading conditions.
But during normal ship operations and before loading, the chief officer need to check and confirm that damage stability criterions are met.
How to check if the proposed stowage plan satisfies the damage stability requirements?
Well, there are few methods to check this but I will have look ahead approach here. As per the new requirements, the loadicators fitted on tankers need to have damage stability calculation capabilities.
So before a stowage plan is finalized, we need to check from the loadicator if this stowage satisfies the damage stability requirements.
If not, the chief officer needs to make required amendments to the stowage until the damage stability requirements are met.
Conclusion
If we are not checking the damage stability of the ship, not only we are risking the environment but we are risking our lives too.
It is so important that ships are able to survive any damage sustained during the adventures it carries on the high seas.
The first step toward complying with the damage stability is to understand what it is and what is required of us.
6 Basics That Will Make the Ship Stability Easy to Understand
Like me if you too are not a naval architect, you and I don’t know how to build a ship. But let us imagine we together built a ship. Or something looking like a ship. A smaller one may be.
With all our efforts, we put this small ship in the water. What will happen?
- Will the Ship sink or float
- Will the ship tilt (list) on starboard side or port side
- Will the ship have any trim or not. If yes, will the trim be by the head or by astern?
If I want to know the answers to these questions, one thing is for sure. We need to be able to understand the language of ship stability.
But Let’s be honest: understanding ship stability can be a huge pain.
Trust me, I know.
But not if you know the basics of ship stability. Once you know these basics, all other parts of ship stability will be as easy as eating a pancake.
And I am talking about most basics things here.
Understanding these basics forms the foundation of ship stability.
In this post, I will discuss 6 of these basic things of ship stability. Let us start.
1. Archemidies Principle
Why does a small metal ball sink in water but not ship? Probably the first question that a Pre-sea cadet is asked during his training.
While the question is quite basic, the answer forms the foundation of ship stability.
The answer lies in the Archimedes principle.
So what exactly is Archimedes principle? As per Archimedes principle
A body wholly or partially immersed in a liquid is subject to an upthrust equal to the weight of the liquid displaced by the body.
Let us first understand two keywords in the Archimedes principle.
- Upthrust
- Liquid displaced
Upthrust
Try to force a ball down into the water. You will feel a force stopping you from doing that. This is the upthrust we are talking about in Archimedes principle.

This force is also called “Force of Buoyancy” or simply buoyancy.
This upthrust will be there on any object you place in water.
Liquid displaced
When we place any object into the water, that object would displace some water. I bet everyone knows it because even the birds know it. Remember the story of thirsty crow?

So if we drop a stone in a jar completely filled with water, some water would spill out of the jar because the stone has displaced some water.
The volume of water displaced would be equal the volume of the stone.
Now let us see what Archimedes principle is trying to say? It is giving us a way to calculate the amount of upthrust that an object will feel when immersed in water (or in any liquid).
This upthrust will be equal to the weight (not volume) of liquid displaced by the object.
2. How do ships float?
So if we have to make something float, all we have to do is to make sure that it displaces more water than its own weight.
Let us say a ship’s light weight is 10000 T. And we have a solid cube of 10000 T weight made of same material.
If both are put in water, while the ball will sink, the ship would float. Why?
The weight is same, the material is same and both are placed in the same water.
As the weight of both is same, the downward gravitational force acting on both is same. But the upthrust acting on the ship will be more than that acting on the ball.
Let us see why?
The upthrust acting on the steel cube will be 1025 T. As the weight of the cube (downward force) is 8000 T, the cube will continue to move downwards and will sink.

Now let us see the forces on a ship with lightweight of 8000 T.
A ship of this light weight is generally of the approximate size of
- Length: 150 meters
- Breadth: 30 Meters
- Height from keel to the main deck: 20 meters
If it is submerged to its full height, it would displace 63000 m3 (150m x 30m x 20m x 0.7) of water. This is considering the block coefficient of the ship is 0.7.
This means that the upthrust acting on the ship would be 64575 T.
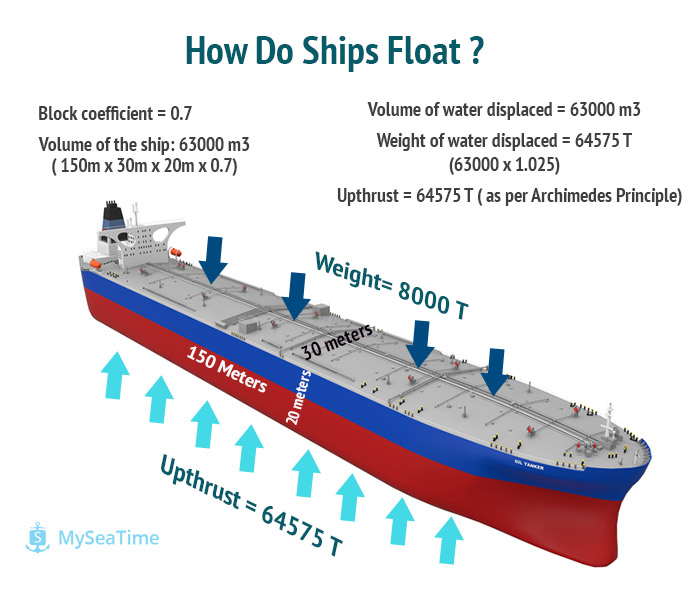
The downward force is same as was for the steel cube.
So why did the ship float while the steel cube sank? That is because the upthrust (Buoyancy) for the ship is much more than that of the cube of the same weight.
Watch this simple experiment and you would understand.
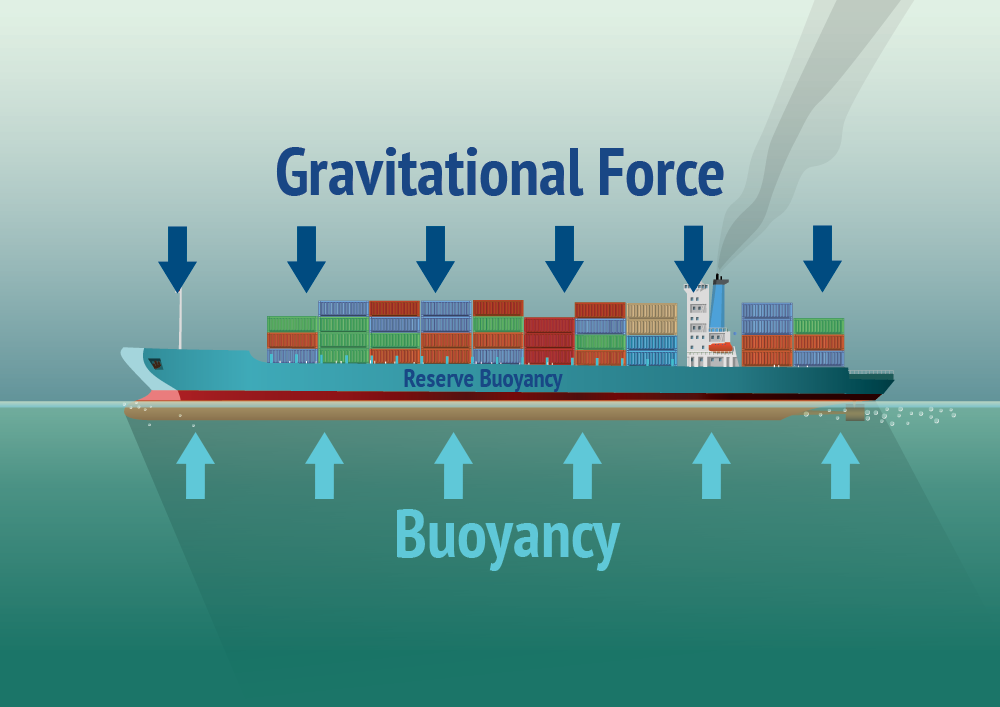
3. Buoyancy
We saw that the ship in the example was able to generate 64575 T of buoyancy when immersed up to the deck line.
As the weight of the ship was 8000 T, this means that the ship will have a net upward force of 56575 T.
This upward force will keep on raising the ship until the upthrust is equal to the weight of the ship. So at the equilibrium, the upthrust (buoyancy) will be equal to the weight of the ship which is 8000 T.
The remaining buoyancy of 56757 T will act as reserve buoyancy.
So when a ship is at rest, the upthrust (buoyancy) acting on the ship will be equal to the gravitational force acting on the ship.
When we add a weight on the ship, this equilibrium is offset as the gravitational force increases. This will cause the ship to sink, till the time buoyancy becomes equal to the downward gravitational force.
In short, if a ship will float or sink, how much will it sink and how will it float is the function of these two forces acting in opposite direction
- Upward-acting force of buoyancy
- Downward acting gravitational force
4. Center of Gravity
The center of gravity of any object is the point on that body at which the total weight of the object is assumed to be acting vertically downwards.
This point is an imaginary point.
For objects in uniform shapes and made of a uniform material, knowing the center of gravity is an easy task. For these objects, the center of gravity is the centroid of the shape.
For objects of irregular shape such as ships, the center of gravity is again the centroid of this irregular shape.
But in this case, it is too difficult to find the centroid of the shape.
But what is the significance of center of gravity of any object?
First, for the stability calculations, this is the point where we can consider the gravitational force acting downwards.
Second, this is the point from which the object will balance.
If you still have any doubt over what center of gravity is, this considerably old video will definitely help.
So where is the center of gravity acting on a ship and how can we know its location?
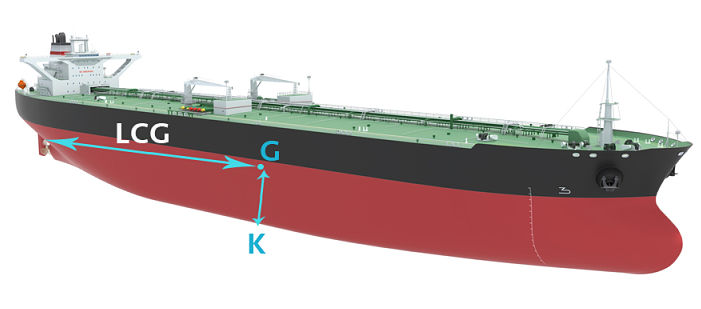
Center of gravity of the ship is measured from three dimensions.
From the centerline of the ship
The first dimension is knowing the location of the center of gravity from the centerline of the ship.
If the COG is on the centerline, the ship will be upright (no list). But if the COG of the ship is not on the centerline, the ship will have a list towards the side of COG.
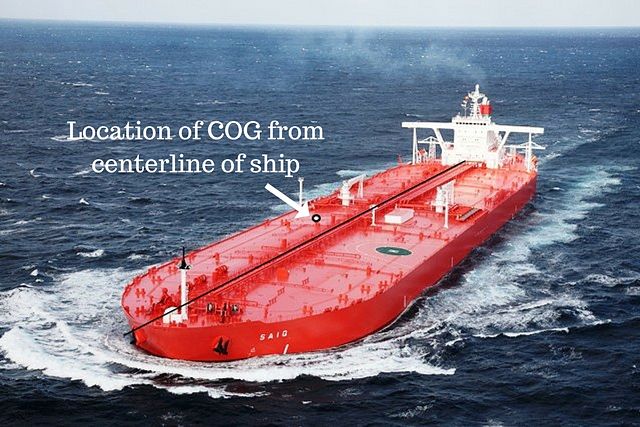
So guess which side the ship would be listed if the COG is as indicated in the above photo?
More away the COG is from the centerline, the larger will the ship be listed.
Sometimes this distance is also referred as TCG (transverse center of gravity)
Location from the forward aft or midship of the ship
The second dimension is the location of COG from the forward perpendicular, aft perpendicular or from the midship of the ship.
This term is called Longitudinal center of gravity or LCG.
LCG is tabulated in the hydrostatic particulars of the ship for different drafts and tr
The location of LCG decides which way the ship will be trimmed. If the location of LCG is exactly at the midship, the ship will have no trim.
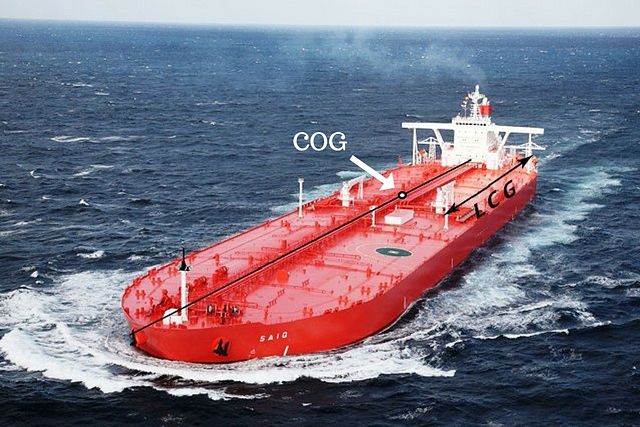
But if the LCG is forward of the midship, the ship will be trimmed by the head. Same way, if the LCG is aft of the midship, ship will be trimmed by the stern.
Location from the Bottom (Keel) of the ship
The third dimension is the location of COG from the keel of the ship. This is known as the Vertical center of gravity (VCG) or simply KG.
If the heavier weights are loaded on the top part of the ship, then COG of the ship will be towards the top of the vessel. In this case, KG of the ship will be a larger value.
If the heavier weights are loaded on the bottom part of the ship, COG will be towards the bottom of the ship and KG of the ship will be a smaller value.
We have already discussed that TCG value decides to the list of the ship and LCG value corresponds to the trim of the ship.
Then what is the significance of the KG (or VCG) of the ship?
To understand the significance of KG, let me ask you a question.
If you are given a task to carry a cube weighing few kilos attached with a rod, how will you hold it? From the rod (position A) or from the cube (position B)?
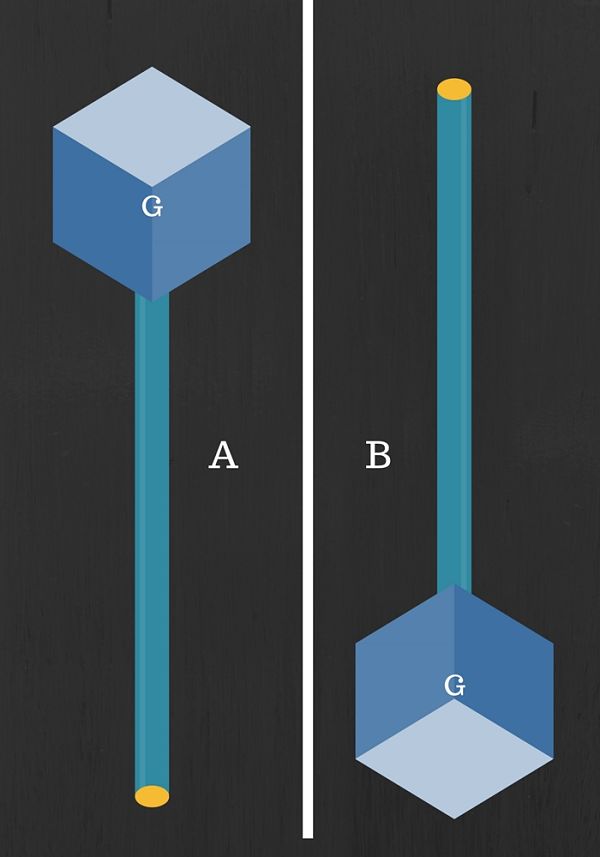
I am sure you would agree that it is much easier to hold the cube than to hold the rod. This is because when the “Center of Gravity” is higher, this whole thing is less stable and can topple with slight external force (like if you are moving in the wind).
Same goes with the ship and any other object. Higher the “center of gravity”, less stable it would be.
So in the case of ships, larger the KG, less stable the ship would be.
5. Center of Buoyancy
Just as the weight of the vessel was assumed to act downward through the center of gravity, the buoyancy force is assumed to act vertically upwards through a single point as well.
This point is known as the center of buoyancy.
The center of buoyancy is the centroid of the underwater part of the vessel.
For the sake of understanding, we can say that center of buoyancy is the center of gravity of the underwater volume of the ship.
As with the COG, COB can also be measured from three dimensions but measuring it from the centerline of the ship has no significance.
So the center of buoyancy is measured from two dimensions.
- From the bottom (keel) of the ship (KB); and
- From aft, forward or midship of the ship (LCB)
6. Equilibrium between COG and COB
This is the crux of the whole ship stability. A ship behaves the way it does because these two opposite forces are trying to balance out and bring the ship to the state of equilibrium.
But for any two forces to balance out, two things need to happen.
- Both the forces need to be equal; and
- Both the forces need to act exactly opposite to each other
Forces at COG and COB need to be equal
We have already discussed this. When we place weight on a ship at rest, the gravitational force acting downwards increases.
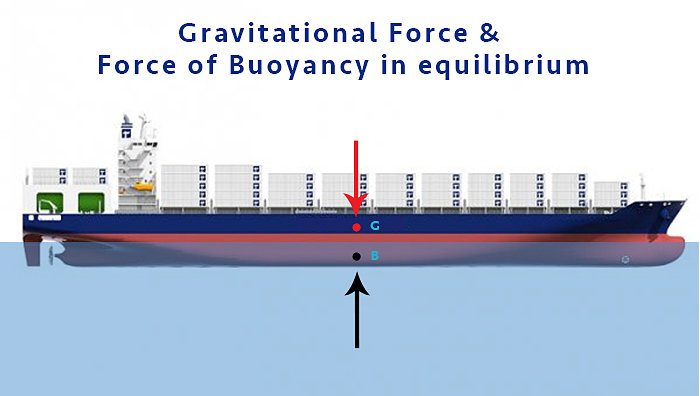
This will cause the ship to sink to a point where the force of buoyancy will become equal to the gravitational force.
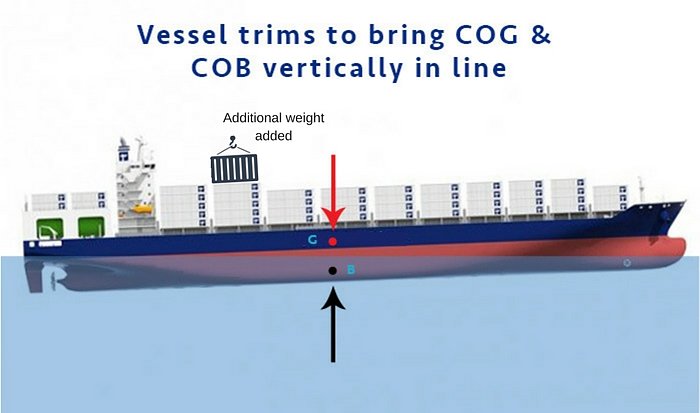
COG and COB need to vertically in line
Now consider that we place additional weight away from the location of ship’s center of gravity.
The ship’s center of gravity will shift and will no longer be in vertical line with COB. This will cause a righting couple that would try to bring both COG and COB in same vertical line.
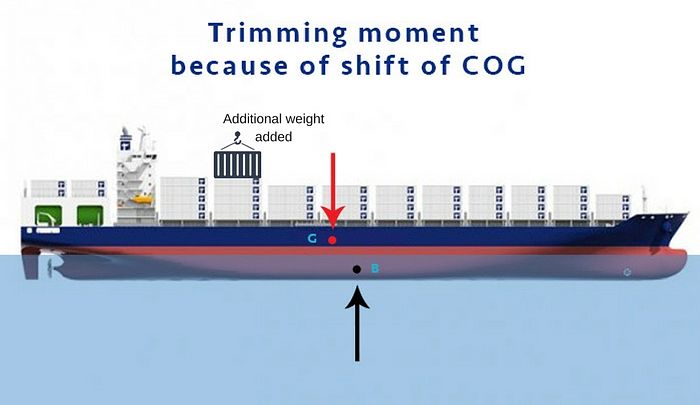
This righting couple will cause the vessel to trim. The vessel will trim up to a point where COB will be vertically in line with the COG of the ship.
Conclusion
Understanding ship stability is an important aspect of the safe ship operations.
Even though it is not simple, understanding the basic concepts of the ship stability lays a foundation of making ship stability simpler.
Center of buoyancy, the center of gravity and the relation between these two is the first thing we ought to understand.
Once we understand this to the core, understanding ship stability may not be as tough as it seems.
5 Classification Society Terms You Need to Understand Now
It is something that no ship can sail without.
Drydocks surveys, statutory surveys, ship building, ship repairs, ISM, ISPS surveys. You will deal with Classification Society of the ship during all these and more.
If the classification society is so much connected with the ship, doesn’t it make necessary for us to know everything about how it works?
In this post, we will discuss 5 terms related to the classification society of the ship.
Let us get started.
1. Class notations
When a master or chief engineer joins the vessel, this is one of the first things that they must look at. The class notations of the vessel.
Where can we find the class notations and what are these for?
Class notations are mentioned in the “certificate of class” of the vessel. These notations are the symbols that signify the standards to which the ship is built.
For example, we want to know if the ship is constructed and strengthened to navigate ice areas.
Where can we find this information? We can look at the class notations in the certificate of class.
We want to know if the ship is built for the UMS operation. Where can we look?
Did you get that right? Class notations !!!
It is so important that ship’s officers understand the construction capabilities (and limitations) of their ship. At least the master and chief engineer must be aware of that.
For example, a ship may have all the elements required for operating the engines on UMS mode. But if there is no UMS notation in the “certificate of class”, it would be a crime to leave the engine room unmanned.
Different classification societies can have their own ways of denoting the class notations. But all have a somewhat similar pattern.
Here are the rules regarding class notation from few of the classification societies
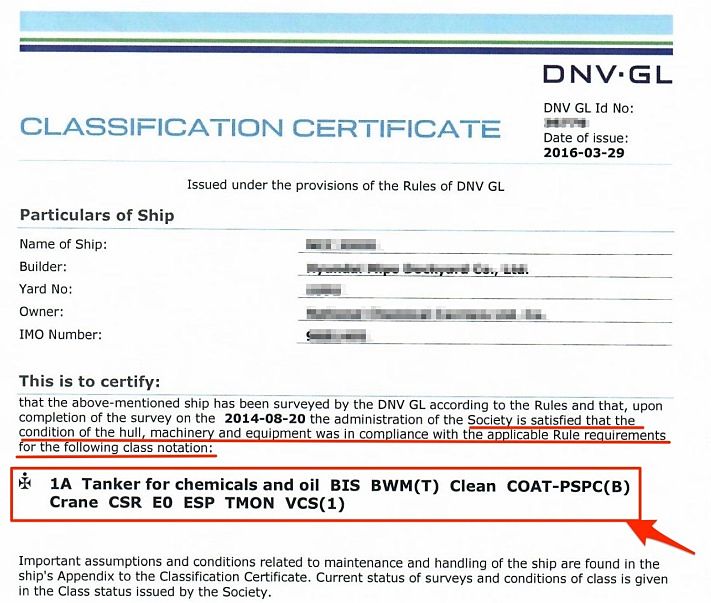
Let us see a class notation of a real ship.
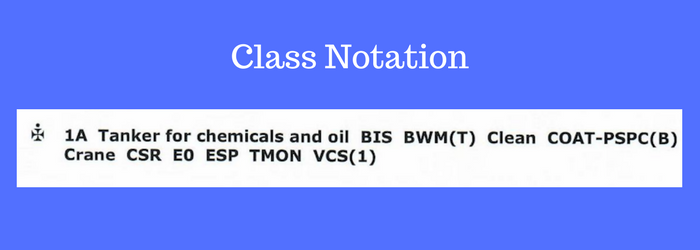
Main class notation (1A)
If a vessel is given the main class notation, it means that the ship’s hull, machinery, and equipment complies with the rules of that classification society.
If the vessel is changing the classification society, the main class notation will also be given if it complied with the rules of the previous classification society.
The whole idea of this notation is to show that ship complies with the construction rules of a classification society.
Tanker for oil and chemical
This denotes the type of the ship. As per this class notation, the ship is built for carrying the oil and chemical cargoes in bulk.
This means that the ship is designed and constructed as per point 5 and chapter 5 & 6 of the class rules of this classification society.
BIS
This class notation denotes that the ship is allowed for the in water survey of the hull and does not need to be dry docked every 2.5 years.
BWM(T)
This class notation is related to the ballast water management on board the ship.
The letter “T” means that ship is fitted with a ballast water treatment plant that complies with the rules of this classification society.
So if you see this class notation, check if the vessel is actually fitted with the ballast water treatment plant?
Clean
This class notation signifies that ship is built to comply with all the relevant requirements of MARPOL.
COAT-PSPC(B)
This class notation signifies that vessel is built to comply with various IMO requirements related to the tank coating.
These IMO requirements are
IMO Resolution MSC.215(82) related to the performance standards of dedicated seawater ballast tanks
Crane
This class notation signifies that the ship is fitted with a crane that is certified by the class.
CSR
CSR means “common structural rules”. CSR class notation means that the ship is designed and built with IACS common structural rules.
Read more about IACS common structural rules.
E0
This class notation signifies that ship is designed for UMS operation.
ESP
This class notation means that vessel is subject to the “Enhance survey program”. If the vessel has this class notation, the master must look for and locate the ESP file onboard.
TMON
The presence of this class notation means that this ship is designed in a way that allows the ship staff to monitor the condition of the tail shaft.
VCS(1)
This class notation means that ship is fitted with the vapor control system on board as per IMO MSC/Circ. 585.
if the vessel has this class notation, the master must also check and locate the approved VECS manual.
2. Class survey status report
The class is involved with almost every aspect of the ship’s certification and surveys. And there are tons of surveys that a ship is subjected to.
All these surveys and audits are carried out by classification society of the vessel.
There are more than 400 items (including CMS items) that need to be monitored by the vessel or the shore staff for maintaining the class of the vessel.
How can the ship staff and the shore management keep track of all these items?
To help track these survey and audits, class issues a report called “class survey status report”.
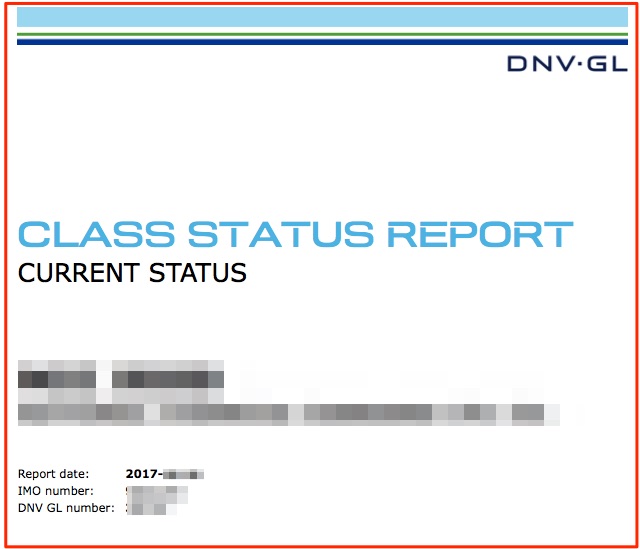
This report is emailed each month (or the interval set by the management) to the email id provided by the shore management.
The report can also be downloaded from the classification society’s website after login with the credential provided by the class.
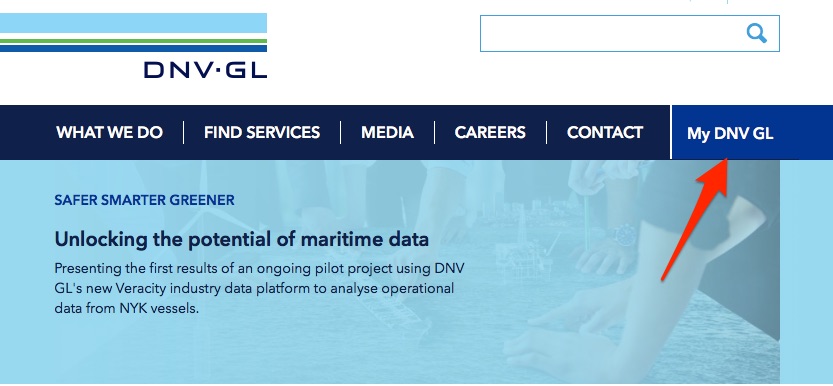
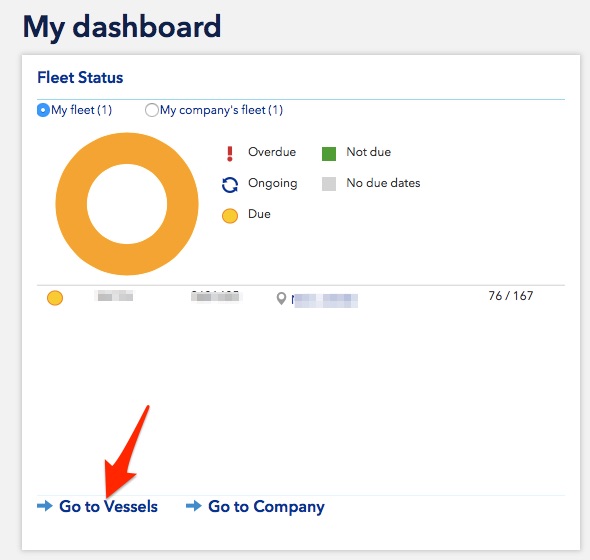
To download the survey report if DNVGL is the vessel’s classification society,
Go to the website page of DNV-GL and click on my DNV GL
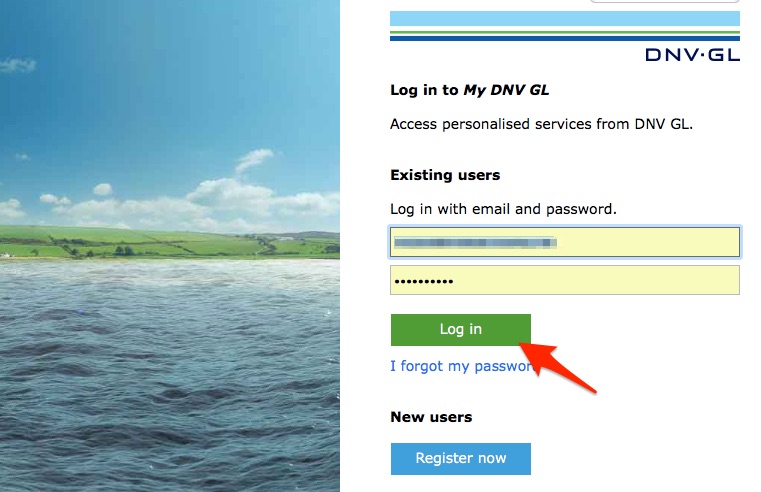
Next, enter the login details (email & password) to login to the DNV GL account.
This will take you to the dashboard. If you are logged in as a shore manager, you will see all of your ships. You can then choose the ship for which you wish to download the class survey report.
Some companies may allow the access of the ship’s data to the master of the ship. In this case, you will only see one ship.
Once you are on the ship’s data page, click on the “actions”.
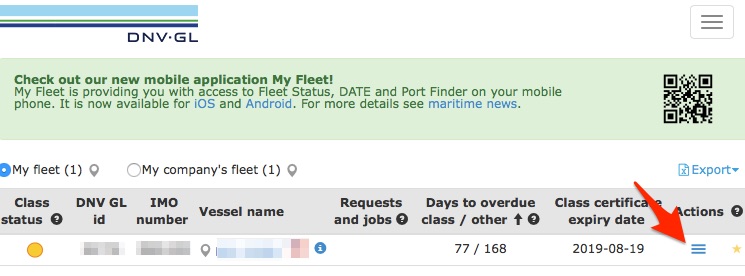
You will see the option to download the “class status report”. Click on this option to download the “latest class status report”.
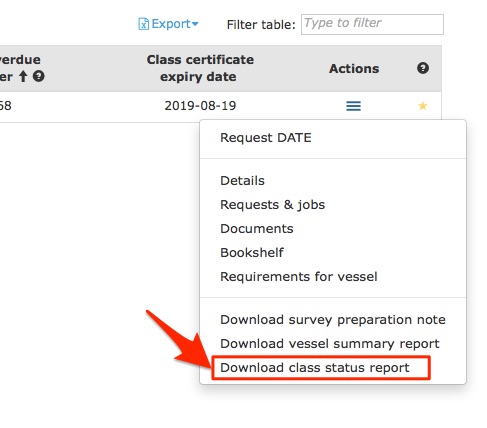
This class status report gives details of all the survey due and expiry date of all the statutory certificates.
3. Class memorandum
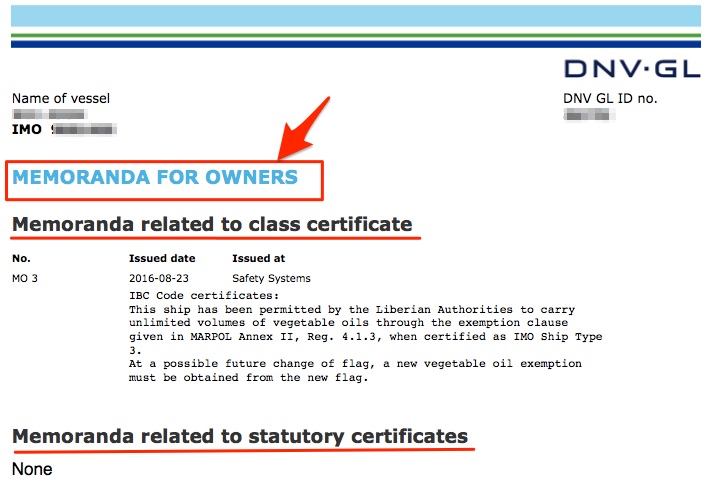
Memorandum to the owners are the notes from the class of the vessel for the ship owners.
Memorandum is important information related to the hull, machinery, equipment issued to the owners by the class that does not require any corrective action.
Memorandum can contain any information that classification society wish to highlight to the owners for future use.
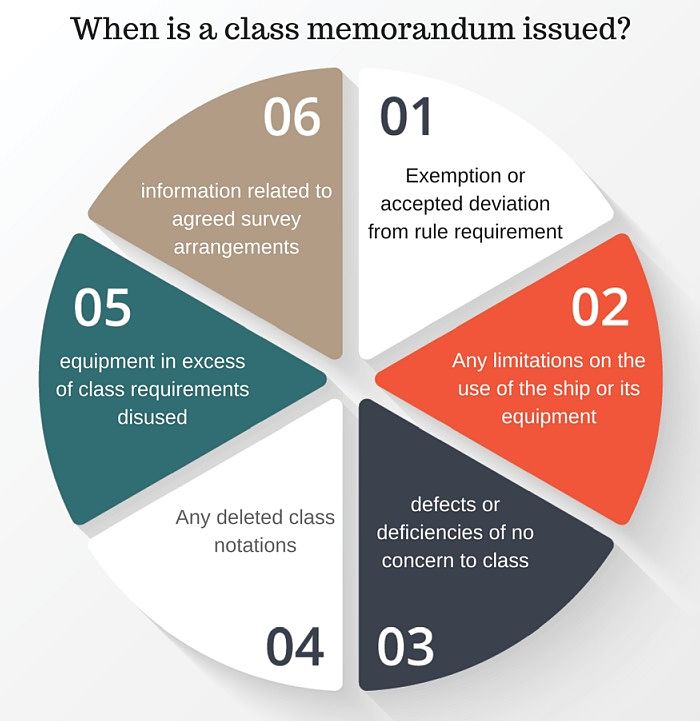
But in general, memorandum will be issued in following cases
- exemptions or accepted deviations from rule requirements
- limitations on the use of the ship or its equipment
- defects or deficiencies of no concern to class
- deleted class notations
- equipment in excess of class requirements disused
- information related to agreed survey arrangements.
Let us quickly discuss these conditions of issuing a class memorandum.
Exemptions or accepted deviations from rule requirements
Let us say there is a dent on the ship side that is not acceptable as per the class rules.
It is however not possible for the ship owner to repair that dent because of time constraints.
Ship owner requests the classification society for the alternate arrangements. Classifications society allows the ship owners to strengthen the dent area from inside the ballast tank by placing additional stiffeners.
This is a deviation from the rule requirement but accepted by the class. But this will be written as the class memorandum to the ship owners.
Defects or deficiencies of no concern to class
There may be defects or deficiencies that are within range of the classification society rules.
For example, there may be a dent on the ship side that is within the range of the classification rules and does not require to be repaired as per the class rules.
But the class of the vessel may want to highlight this dent to the ship owner. Classification society, in this case, will mention this dent as a class memorandum.
Information related to agreed survey arrangements
Classification societies also like to highlight the forthcoming new survey requirements that ship owners must be aware of.
For example, classification societies may like to post a memorandum to the ship owners about the “Ballast water treatment plant” requirement at first renewal survey after September 2017.
Important note about class memorandum
So far I have said that there is absolutely no corrective action or survey required for a class memorandum.
That is correct in a true sense.
But there are some bad class memoranda. These are the ones that third parties do not want to see for a ship they are involved with.
Who are these third parties?
- Charterers, who do not want to take any chance with the safety of their cargo
- Oil majors, who do not want to associate themselves with a ship that has some structural defect or damage
One example of such bad class memorandum is a dent on the ship side which is within the acceptable limit.
Master of the ship should equally be concerned about any such class memorandum related to the structural damage.
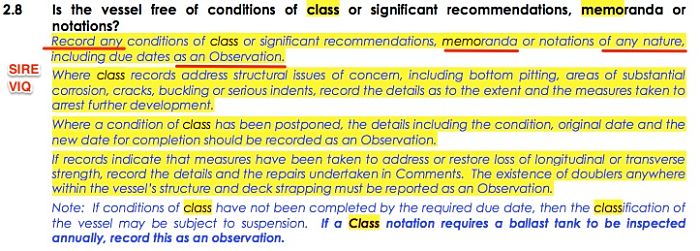
But where do we find class memorandum, if any? It is there in the class survey status report.
4. Condition of class
It is hard known fact that vessel cannot sail with major defect related to the structure, machinery or equipment.
Certificate of class is issued to the vessel after verifying all these elements.
But what if a machinery or an equipment become defective or vessel sustains a damage and there are no resources available to rectify this immediately.
For example, look at these situations
- Main engine governor becomes defective. Spare parts and technician are available only at next port or after few days. Main engines, in this case, can only be controlled from the emergency station.
- Vessel sustains hull damage because of a collision incident. The repairs are only available at a port that is a few days away from the present location.
What can be done in this situation? Ship need to trade.
The first thing that is required is the presence of a class surveyor who will assess the damage or situation.
After assessing the situation, he may suggest some temporary measures and allow the vessel to sail for a certain period with these temporary measures.
In this case, the class will issue “condition of class” to the vessel.
Master’s actions on receiving a “condition of class”
Believe me, though class and flag of the ship may allow the ship to trade for few days with “condition of class”, it is something that is not good for the ship.
The first duty of the master on receiving a condition of the class is to let the whole world know about it. At least the to the people connected with the ship.
Because they would know it anyway.
If you have an oil major cargo on board or you are bound to or from an oil major port, the ship will not be allowed to move an inch with this “condition of class”.
Same could also be the case with some charterers. So it is important to make sure that all of them are made aware of this “condition of class”.
On receiving this notification from the master, technical department of oil major may contact the master over the phone. Be prepared for questions like
- What temporary measures has been taken by the vessel apart from those suggested by the class?
- Do you feel that it is safe to sail the ship with this condition of class and with these temporary measures?
If the master’s answer to the second question is No, oil major won’t allow the ship to sail for obvious reasons.
If the master’s answer to the second question is Yes, be prepared for the follow-up question. Why do you feel so?
Though the master is legally allowed to sail the ship with the condition of class, it is important for the master to ask this question to himself even if no one asks him.
Is it safe to sail the ship with these temporary measures and with this condition of class?
5. Class Reports file
If you already have few grams of sea salt in your blood, you must have come across some of the class surveys.
After completing the class survey and before leaving the ship, what documents do the class surveyor give to the master?
It is the
- Order confirmation; and
- Survey statement
Order confirmation is the confirmation from the shipowner (or manager) to conduct the survey. That is not so much important.
But the survey statement is an important document. Survey statement is the report of the outcomes of the survey carried out.

These reports need to be filed adequately in “class report file”. The blank file is generally provided by the class.
The idea is to have a file that gives the history of the ship’s hull, machinery, and equipment.
On tankers, this file is one of the checking points for the vetting inspectors.

If you do not have all the survey statements in the file, you ask your company to download and send the survey statements from class website.
If the company allows the ship to access the class website with ship’s email id, you can log in to the website and download the missing survey statements.
For example, if vessel’s class is DNV GL, you can log in to my DNV GL account. Then go to the vessel details page by clicking on the name of the vessel.
One on the vessel’s detail page, go to “Documents” and then “Survey statements”.
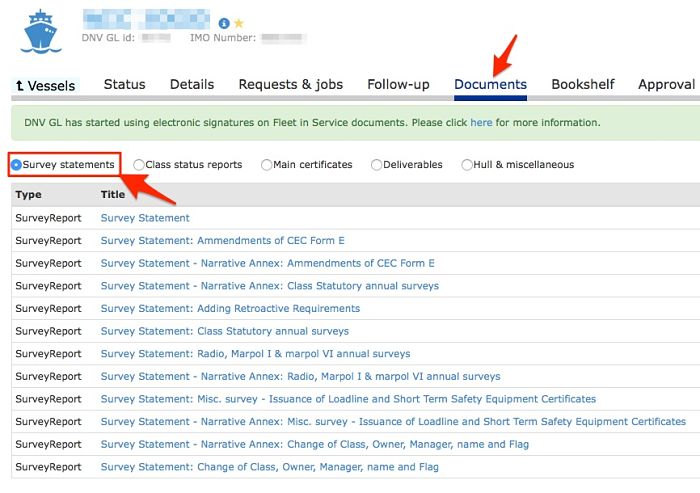
This will give all the survey statements of the surveys carried out by the class in the past.
Click on the one that you wish to download and the survey statement will be downloaded.
Conclusion
Classification society of the vessel is involved with almost all the surveys and audits of the ship.
Classification societies use different terms to document these findings. Ship staff must be aware of these terms to understand the seriousness of the data under these terms.
Have you come across any other term related to classification societies ?
Declaring Emergency: Important lessons for seafarers from air crash investigation

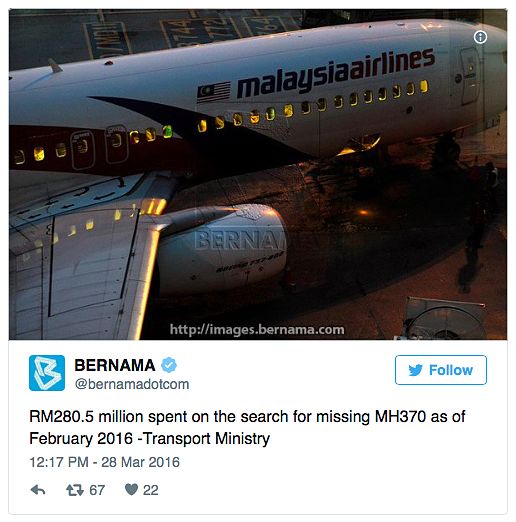
Have you been following the news about the disappearance of Malaysian Airline MH370? I am one among millions who agree that Airplane crashes are one of the most dreadful things to imagine.
What amazes me more is how the airline industry responds to these accidents. They spend billions of dollars to learn a lesson from these accidents.
I am afraid that isn’t the case in the maritime industry.
Let me narrate an incident.
I happen to visit a ship a month after a major incident involving a spill of dangerous chemicals on a chemical tanker. Apart from many other factors, one of the reasons for this incident was heavily leaking manifold valves. Master, chief officer, and duty officer were sacked.
When I visited this ship a few months later, I found, out of 42 manifold valves, around 35 still heavily leaking. The company had spent a lot of money in training their staff but failed to rectify the root cause.
While I agree that the situation in the maritime industry is not as bad as the example above. But it is not as promising as the airline industry.
So why not learn few lessons from air crash investigations, which may equally be applicable to the maritime industry.
In this post, I am highlighting an important lesson that I learned from the investigation of Avianca flight 52. Learning from this incident can make us better decision-makers than we are now. It did make some effect on my decision-making capabilities and I am sure it will do the same to you.
What happened to Avianca Flight 52
On 25th January 1990, at 1508 Hrs LT, Flight 52 left Medellin and was bound for Norfolk in the US. Flight 52 arrived over Norfolk around 1903 Hrs LT.
From 1903 Hrs to 2115 Hrs, the flight had to wait and circle around because of traffic congestion. The problem was that flight 52 was running out of fuel.
The first officer had told the air traffic control about their situation many times. Finally, at 2115 Hrs, flight 52 was given a thumbs up for landing.
But because of reduced visibility, the flight made the attempt to land but could not land. The pilot had to abort the landing. He climbed up again.
Again flight 52 was told that they are no 2 in the row for landing. They had to wait in spite of telling that they are running short of fuel. Finally, when they made the second attempt for landing, the fuel had completely finished.
Avianca Flight 52 crashed near the airport.
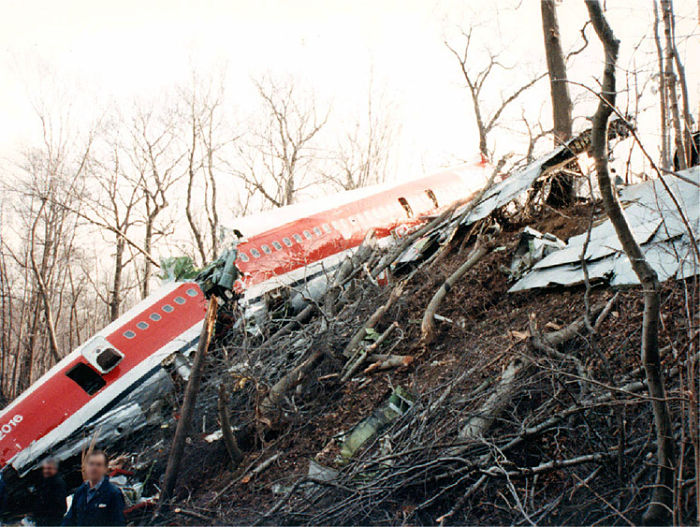
Out of 158 people on board, 78 died.
Findings of Investigation report
There was a detailed investigation of the incident and there were a number of findings. But the finding that was really important was this.
Even though the pilot advised the traffic control about their situation repeatedly, but at no point, they used the word “Emergency”. They never said, we have an emergency on board. And because of that, air traffic control could not fathom the graveness of the situation.
Can you imagine? 78 people died because someone did not say the word emergency.
How the findings applicable to the maritime field
If you think there have not been similar incidents in the maritime field, think again.
Similar findings may or may not have been documented in the investigation report. But there have been many such maritime incidents.
Incidents where people lost their lives because Masters did not declare an emergency.
The sinking of an Indian ship in the Bay of Biscay
For example, look at the incident of the sinking of an Indian cargo vessel in the Bay of Biscay in the mid-90s. This vessel was stuck in heavy weather in the Bay of Biscay.
During heavy rolling, lashing of the steel plates loaded in one of the holds gave way. Loose steel plates holed the ship side.
Water started to ingress. Master had enough time to declare the emergency and save many lives. But he insisted that the situation is under control.
He kept people engaged in temporary repair of the irreparable ship side. The result was, few survived but most lost their life including the Master himself.
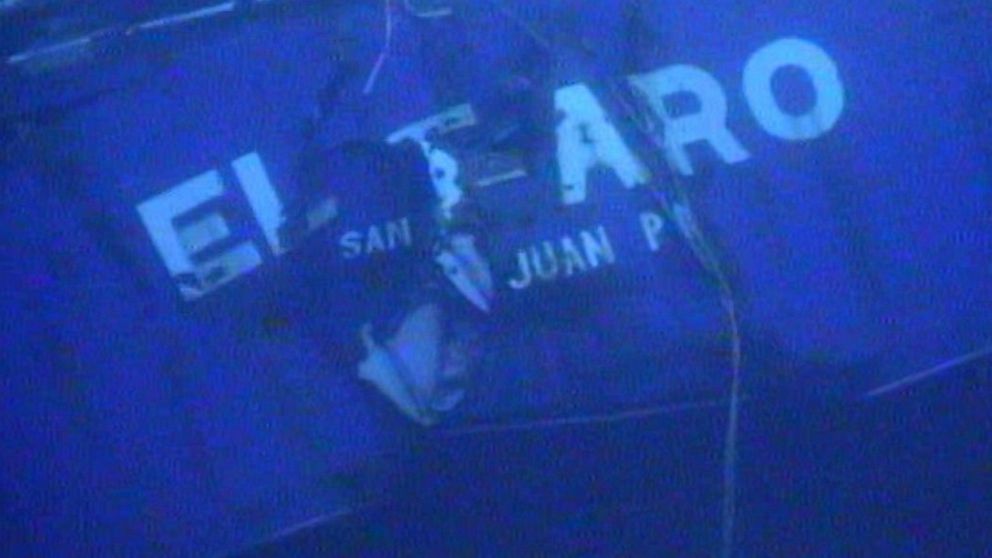
The sinking of El Faro
The sinking of the vessel El Faro has been in the news for the last couple of years. In Oct 2015, the vessel El Faro sank with its 33 crew members when it was caught in Hurricane Joaquin, near the Crooked Island, Bahamas.
If you haven’t followed the investigation of El Faro, read these reports on the sinking of El Faro.
- El Faro incident
- Doomed El Fargo Captain Ignored 3 Hurricane Warnings Then Told Crew: ‘I’m Not Leaving You’
- “Incredibly moving” audio from Ek Faro’s final hour
In the VDR transcript accessed by NTSB, when Captain Davidson returned on the bridge just three hours before the sinking, this is what he said about the heavy seas
“This is every day in Alaska, this is what it’s like.”
Get it what I am trying to say? He had not declared the emergency yet. Not to himself, not to anyone.
What exactly qualifies as an emergency?
So what exactly are we talking about here? What is an emergency?
We aren’t talking about the sinking of the ship. That would be a distress situation.
And the procedures are well defined for identifying and responding to a distress situation. We are talking about a situation that could lead to a distress situation.
The dictionary meaning of emergency is
an unforeseen combination of circumstances or the resulting state that calls for immediate action
Another definition from another source
The sudden, unexpected, or impending situation that may cause injury, loss of life, damage to the property, and/or interference with the normal activities of a person or firm and which, therefore, requires immediate attention and remedial action.
Immediate action is the common keyword in all the definitions.
Wikipedia has another take on this
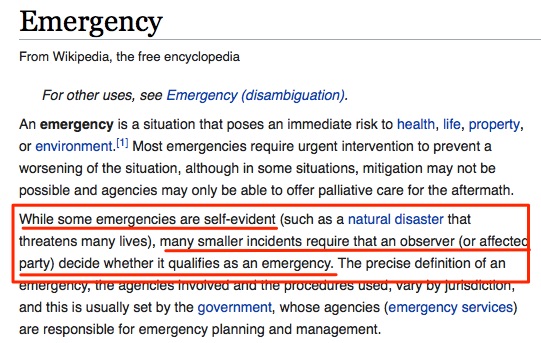
Note the line “…many smaller incidents require that an observer (or affected party) decide whether it qualifies as an emergency“.
That is exactly the point of concern. We cannot afford to delay to identify and then declare an emergency when it arrives.
Declaring emergency to yourself
Declaring an emergency does not always mean declaring it to a third party. Sometimes you need to declare an approaching emergency to yourself and take action.
In spite of the approaching hurricane, why do you think the captain of El Faro did not take effective action to avoid the path of the hurricane? That is because he did not declare the emergency to himself.
And when he did declare the emergency to himself, it was too late.
Importance of declaring an emergency
Why is it so important to declare an emergency? Why is it important to use the word “emergency” when we are declaring an emergency?
Simply because the word “Emergency” raises eyebrows and opens eardrums.
For example, I know of one incident where one of the crew members was feeling weak and the master suspected internal bleeding.
When he called CIRM Rome, they also felt likewise. The vessel was arriving in Fujairah in few hours and there were a number of emails requesting medical assistance on arrival.
But look at one of these emails.
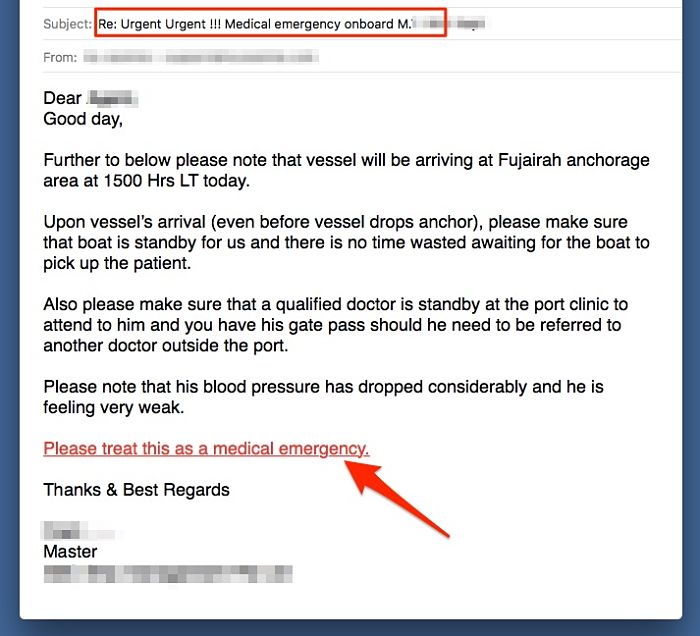
The subject line is clear and the text in red left nothing to doubt about what the master wants from the people arranging the assistance.
“We have a sick person on board” and “We have a medical emergency here”.
Which sentence would bring people to action? That’s right !!!
Why people hesitate to declare an Emergency
Never hesitate to declare an emergency. That is a brilliant lesson.
But heck, it is easier said than done.
So let us break down the reasons why people hesitate to declare an emergency and learn few lessons from these reasons.
1) Tag of Incompetent
This, in my opinion, is the topmost reason for choosing not to declare (or delaying to declare) an emergency.
Many believe that declaring an emergency would be perceived negatively. As if they did not handle things well to arrive at this situation.
While this thinking is true in many companies, many times it is just the build-up of our own mind.
Whatever the reason, here is lesson # 2.
When in a situation that warrants declaring the emergency, do not think about after-effects. Do your job and declare an emergency if you are in one.
2) Hiding something
Sometimes people won’t declare an emergency to avoid their mistakes surfacing.
Let us take this example. While loading at a port, a seaman is sent inside a cargo tank that is clean, empty, and gas-free. For some reason, he becomes unconscious inside the tank.
Port will have the best help in this case but the master may delay declaring the emergency.
Master may direct the other crew to rescue him without letting the loading master know or without stopping the cargo operation.
Why?
Because to avoid a fact to surface !!!
That a crew member was allowed to go inside the tank without an enclosed space entry permit, even when it is not allowed while the vessel is at berth.
What would you do in this situation? Would you raise the alarm immediately upon hearing a man unconscious inside the tank?
Heck, it is so easy for me to claim that I will raise the alarm immediately. But in reality, most people would first assess the situation. They would only raise an alarm if it is absolutely necessary.
The best learning (# 3) from this is
Never do something in contrast to the ship’s SMS. Never come under commercial pressure.
Finally, if you find yourself in a situation that arrived because you did something against the SMS, follow lesson no 2 anyway.
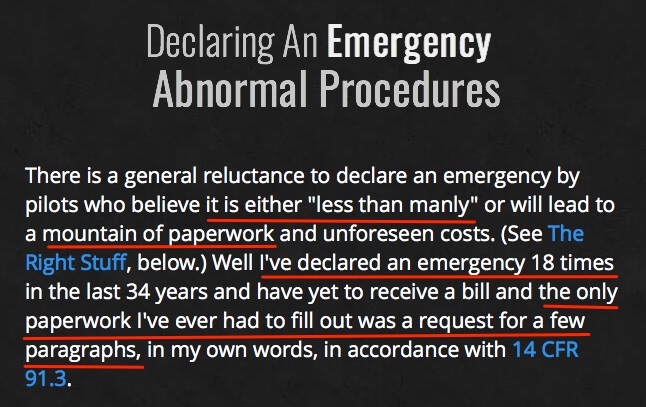
3) More paperwork
Few people won’t declare (or delay declaring) an emergency because they think if they do, they will have a heap of paperwork to follow.
Well, that is not always true. Not on ships, not anywhere. For example, here is what an airline pilot has to say about this.
4) More common in category X Shipping companies
So far we have said that
- Declaring an emergency will not always be considered as a reason for your incompetence
- Do not come under commercial pressure
- declaring the emergency will not lead to a heap of paperwork
While all this is right but heck, not always.
If you are sailing with a category X company, you may find that
- people are declared incompetent for declaring emergencies
- there is always commercial pressure and you find it difficult to avoid
- Declaring an emergency lead to a lot of paperwork
So what is a category X company? It is a company that has theory X managers.
Douglas Mcgregor introduced the theory of management. As per him, there are two styles of management. Management style X & management style Y.
Managers with style X think that
- People are lazy, do not wish to work.
- People need to be nudged, pushed consistently to have them work
- If people are not made to struggle, they would be lazy and will not work.
But the managers with style Y have different thinking than the manager with managerial style X.
Managers with style Y think that
- People like to work. In fact, people enjoy working
- If people are given a good environment, they work better and produce amazing results.

People will always be reluctant to declare an emergency in companies with category X managers.
Here is lesson # 5.
If you do not like the style X managers, switch to a company with managers with style Y.
5) People who find difficulty in saying “NO”
A friend asked you for money but you have the money but you too need it. You know you may not get it back easily.
You still could not say No.
Let us discuss another example. Superintendent asked you (the master) to get this job completed by today.
You know it is difficult to complete this in one day. But you find it difficult to say No. And then you push your crew to complete the job.
Ever found yourself in this situation?
Research at the University of California showed that the more difficulty you have in saying NO, the more will you be under stress, even depression and your efficiency will be low.

The same goes with the tendency to declare an emergency in an emergency situation.
The people who find it difficult to say no, are more likely to hesitate in declaring the emergency when they should.
So here is lesson # 6
Conclusion
One of the critical qualities that we need to possess while working in a high-risk industry as shipping is to be decisive.
In emergency situations, being decisive is of utmost importance. We today have so many checklists to help us in dealing with all sorts of emergencies.
But all those checklists are only of use when we declare that we are in an emergency situation.
Even when we have convinced ourselves that we do have an emergency situation, make sure that we convey this to everyone.
Shout it loud and clear by using the word “emergency”. Do not hesitate to say “we have an emergency”.
Here is All You Wanted to Know About P&I Clubs
It’s Almost July of this year. What’s so special in July, you may ask.
Naaa.. It’s not my birthday and it’s not my son’s birthday.
This is the time I have to shell out a huge chunk of money for my car insurance. Year after Year, each year.
Now if I am so much worried about my Car’s insurance premium, Imagine about the ship owners.
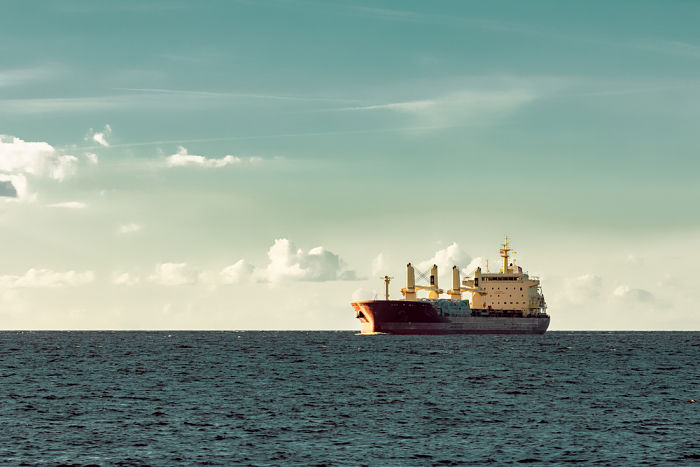
Imagine how much money they need to pay for the insurance of their ships. But that is the cost they cannot avoid.
These costs are for the insurance of ship’s hull and machinery. The good part in this insurance is that costs are known to the shipowner and they can plan for that.
But when a ship is navigating at sea, carrying cargo and is involved in all these activities, it is subjecting itself to a number of claims against the ship owners.
For example, a port can claim that ship damaged its fenders or a buoy while berthing. Or the port can claim that ship polluted their waters.
So it is not about only insurance of damage to the hull and its machinery but also about all the claims that ship owner can get against him.
There can be a number of other kinds of claims. Some logical and some illogical. But ship owners have to make sure that they are insured for all of these.
In this post, we will discuss where P&I clubs fit in the marine insurance and how do these work.
Let us jump in.
Where do P&I clubs fit in marine insurance?
Broadly there are three types of marine insurance.
- Insurance for the ship (Hull and Machinery)
- Insurance for the cargo (Taken by the shipper)
- Insurance for the third party claims
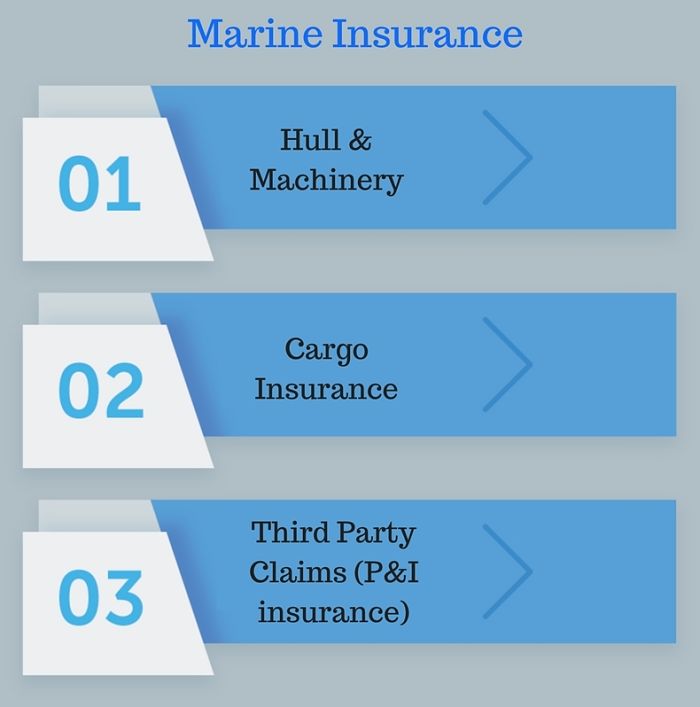
Hull & Machinery policy
Insurance for the ship’s hull and machinery is provided by H&M underwriters. This is the oldest kind of marine insurance and most basic one too.
This is the insurance for the damage to the ship’s hull and machinery.
H&M insurance policies have few important clauses that shipowners have to abide by.
For example, H&M policy has International Navigation Limits. The international navigation limits define the geographical limits within which the ships can trade without any additional premium.
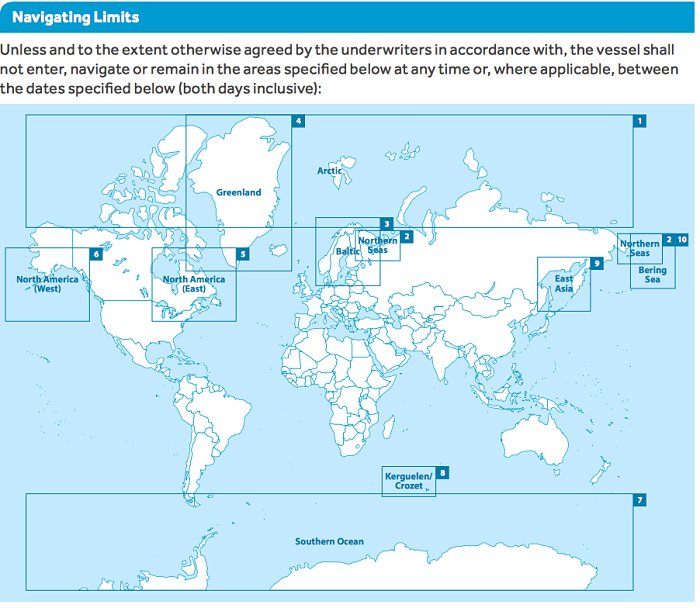
Another example, H&M policy restricts the ship to proceed to war zones without informing the H&M underwriters. Again, this is because of additional risk that these areas pose.
Cargo insurance
The shipper has shipped the cargo and the cargo gets damaged during the voyage. Can shipper claim all the costs from the shipowner or carrier?
If you understand the “Hague-Visby rules” you will know that these rules provide many defenses to the shipowner.
So if these defenses apply to a case, the shipper would have nobody to claim these damages from.
This is the reason that shipper insures the cargo at each leg of the voyage.
P&I Insurance
P&I insurance is used for the third party claims towards the ship owners. Shipowners provide a service of carrying the cargo of the shipper.
While providing this service, a shipowner may be subjected to a number of claims from third parties.
These claims could be damage to the jetty, pollution from the ship or even the fines to the ship from authorities.
Shipowners need to insure for all these third party claims. P&I clubs provide insurance to the shipowners for all these claims.
Why P&I Clubs?
Before the 19th century, the term “marine insurance” only meant the insurance for the ship’s hull and machinery.
This was the time when most of the ships were sailing vessels.
The chances of collision between two sailing vessel’s were less. But as more and more steamships came to the sea, the chances of collision between ships increased.
Underwriters became concerned about this increased risk. Rightly so because in collisions between two vessels, H&M insurers not only have to cover the damages of the insured ship but also pay for the damages of the other ship if the blame is on the insured vessel.
To take care of part of this risk, they introduced a clause in their policies.
This clause was called “3/4th Collision Clause” or “Running down clause“. As per this clause, the underwriters will only pay 3/4th of the total liability or claims against the ship owners in a collision incident.

This clause is there in the Hull & Machinery policies even today.
Let us see this with an example. Let us say there has been a collision between two ships. The “hull & machinery insurance” of both the ships will study the investigation of the collision to set up the percentage of blame.
Let us say the blame was set as below
Ship A: 70% responsible for the collision
Ship B: 30% responsible for the collision
The repair costs for both the ships are as follows
Ship A: USD 100,000
Ship B: USD 250,000
Total cost of repairs: USD 350,000
The liability of both the ships will be
Ship A: USD 245,000 (70% of the total costs)
Ship B: USD 105,000 (30% of the total costs)
So ship A need to pay USD 145,000 to ship B apart from USD 100,000 damages to its own ship which will be covered by H&M insurance.
As per 3/4th collision clause, the H&M insurance company will pay only 3/4th of this amount.
So payable by H&M insurance: USD 108,750
Payable by shipowner: USD 36,250
The ship owners wanted to insure this amount too without exorbitantly increasing their insurance premium.
Shipowners could get this 1/4th liability insured but for that, they needed to pay an additional premium. Shipowners wanted to avoid that.
This led to the formation of P&I clubs which works on the principle of mutual sharing or pooling of the risk.
With time the P&I clubs insured many other risks the owners were subjected to in their business of running the ships.
How do the P&I clubs work?
P&I clubs work on a non-profit basis. It is the club of shipowners who are acting both as assured and insurers.
P&I clubs work on the principle of mutual sharing and pooling of the risk.
What does this mean? Let us understand this with a simple and most basic example.
10 shipowners form a club for sharing each other’s risk. All these 10 shipowners have one ship each which is of the same type, size and value.
At the end of the year, one ship had third party claim of USD 1000 to pay. This claim of USD 1000 will be shared by all the 10 shipowners equally.
So each shipowner would contribute USD 100 to pay this claim. This means that with just USD 100, each shipowner was able to cover the risk of the third party claims.
Now that we know the basic principle of working of P&I clubs, let us understand few basic terms used in P&I clubs.
Calls
In more realistic situation P&I club cannot afford to ask the contribution of each owner only when there are some claims to settle.
In our example, the claim of USD 1000 would need to be paid immediately to avoid the delays to the ship. This means that P&I club needs to have money in its account to pay for the third party claims.
P&I clubs maintain a fund and ask the shipowners to contribute to this fund
- when a new shipowner joins the club or
- when the fund money goes down because of the claims settles.
- Annually or as per the rules of the P&I Club
All these requests to the shipowners for the payment are called “Calls”.
So these may be
- Advance calls (Paid when a shipowner joins the club or at the beginning of year)
- Supplementary calls (Paid when the funds have gone down because of claims paid )
- Release calls (to settle the account of a ship that is sold or scraped or shipowner leaves the P&I club)
Deductibles:
Deductibles in a claim is a common practice in all kind of insurances.

The deductible is the pre-set amount deducted from the insured loss.
Let us say that a P&I club has set the deductibles for claims arising from damage to the jetty as USD 5000.
Now if the claim towards the shipowners for one of such incident is USD 30000. Then the P&I club would pay USD 25000 after USD 5000 as deductible from this claim.
Deductible serves two purposes
- It discourages the shipowners from claiming the small amounts.
- It ensures that shipowners have increased interest in minimizing the casualties and claims
Now let us see this from the perspective of a ship owner who just bought a ship and needs to enter a P&I club.
A new shipowner entering into the club
It is important for the shipowner to insure all risk involved with the operation of a ship. Apart from “Hull & Machinery” insurance, entry of the ship into a P&I club is important.
So the ship owner would first approach the P&I club for including him and his ship into the club.
The P&I Club will assess all the factors before deciding if it is OK to include this ship owner and this ship into the club. Some of the factors the club would be looking for are
- Suitability of the cargo spaces for the intended cargo
- Proficiency of the crew
- previous track record of the ship owner and/or Ship managers
- Standards of classification society
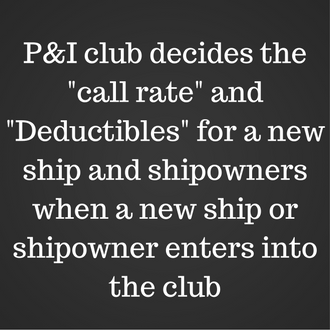
Once the club decides that the ship can be covered, the details of the cover provided by the club would be shared with the ship owner.
The details would include the call rate and deductibles for each type of risk. Call rate is expressed as amount per gross tonnage.
If agreed the ship owner will pay the “advance call” and P&I club will issue the “certificate of entry” to the ship owner.
Finances of a P&I club
Let us see how the finances of a P&I club are handled?
Incomes
As discussed, the P&I Club maintains a fixed amount of fund which is used for the settlement of claims.
The P&I Club maintains this fund through the payments of the advance calls and supplementary calls from the members.
Some part of this money is also invested to earn some profit which again goes into the fund. This all becomes the income part of the P&I club.
So in short, the income part of the P&I club include
- The Annual contribution from the members.
- Contribution of new members or new ships entering the club
- Interest/Profit earned on the investments of the fund
Expenditures
It is too obvious to say that P&I clubs will have many expenditures. The major chunk of which goes in the settlement of claims against its members.
Apart from that, another expenditure of the P&I clubs is the management cost of running the club. Management cost would include the salaries of the employees and rent of the offices etc.
P&I clubs also reinsure some of its risks. The cost of such reinsurance also comes under expenditures.
So the expenditure part includes,
- payments made as claims settlements,
- Management costs
- Reinsurance costs

Balance of Income and Expenditures
Once the incomes and expenditures are known, the balances are just the game of addition and subtraction.
At the end of the year, the amount short of the agreed amount to maintain in the fund is contributed by each ship owner.
The contribution paid by a ship owner is equal to the “call rate” multiplied by the total gross tonnage of his ships insured by the P&I club.
The call rate would be different for different owners and for different ships.
The call rate for a ship owner depends upon factors like
- past history of claims of the ship owners
- the age of the ship
- crew proficiency and knowledge
- trading patterns of the ship
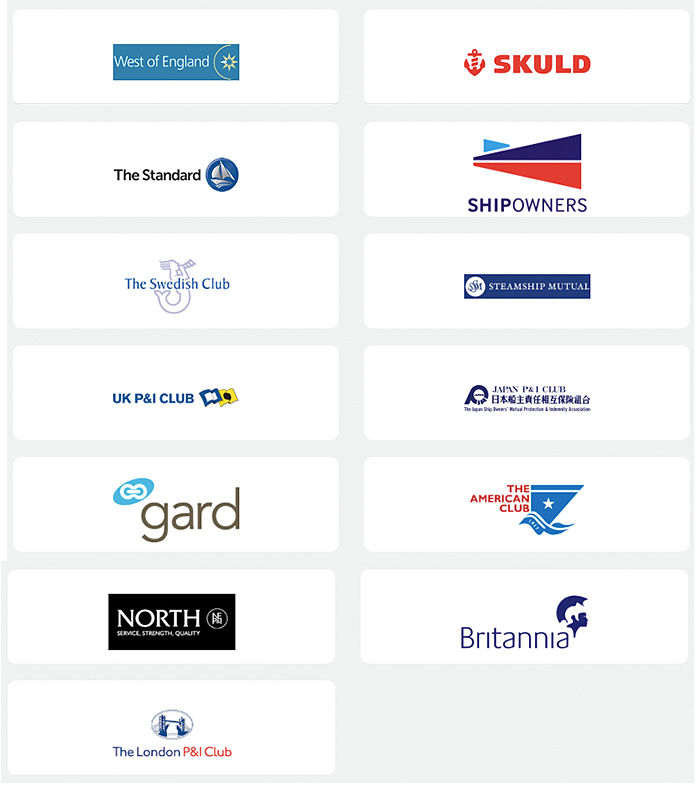
International group of P&I clubs
I know we don’t hear this terms quite often. But there is this group of P&I clubs that plays an important role in the third party claim insurance.
This is the group of 13 P&I clubs. All these P&I clubs are bound by the agreement called “International Group Agreement“.
The purpose of this group is to
- set the rules of engagement and cooperation between the clubs
- provide a unique and invaluable forum for sharing information on matters of concern to clubs and their members
- Provide a pooling agreement between clubs for claims exceeding USD 10 million
So any claim that exceeds USD 10 million, the excess amount will be shared by the member clubs of this group.
As this is a huge group, it allows the group to economically share the large claims.
Conclusion
It is not uncommon for the seafarers to deal with P&I club correspondents. When there is a claim or an incident, we are asked to call for the attendance of P&I club representative.
If we know how the P&I club functions and more importantly that they are on our side, dealing with these situations becomes easy.
This makes the knowledge about the functioning of P&I clubs so much important.
How Masters Need to Handle False Oil Record Book Entries ?

I can site a number of incidents where either the chief engineer or master is sentenced for a prison term ranging from a few months to few years.
I can also name many incidents where a company is handed over a fine ranging in millions of dollars.
I am talking about the incidents related to false oil record book entries.
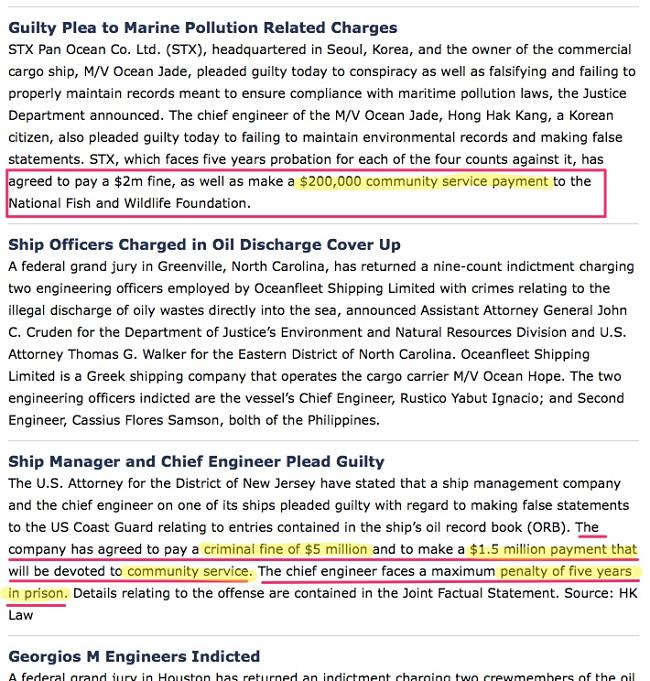
What’s more !!! In 2016, Princess Cruise Lines paid USD$40 million as a plea agreement in respect of a number of US MARPOL violations. This is the largest ever criminal penalty involving deliberate vessel pollution.
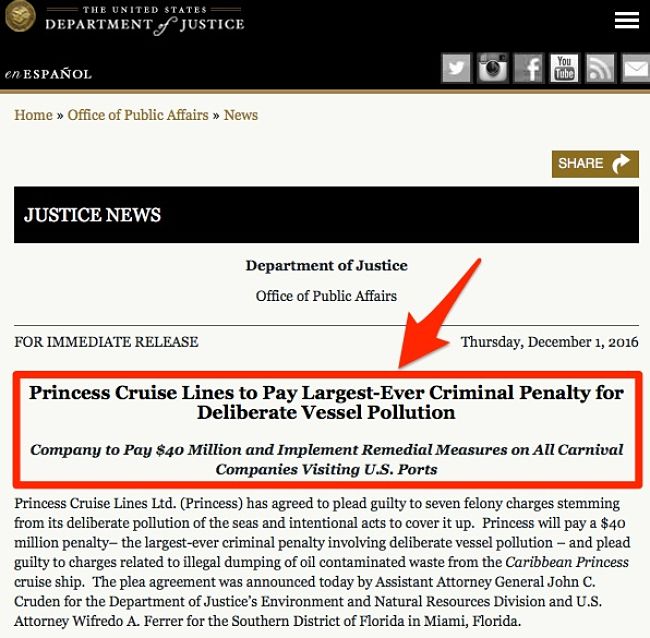
That is huge amount of money.
In United state, involved of National whistleblower center has seen increase in number of reported Marpol violations.

Port states these days consider the false oil record book entry as the “signed confession” by the person making the entry.
I am just trying to show here the seriousness of this matter. Usually the serious matters warrant serious measures. Not in this case.
In these cases, measures required are so simple.
To avoid these situation, we just need to ensure that we do not make any false entry and we do not violate Marpol.
But for Masters the situation is not that simple. Sometimes they may find themselves into these situations for no direct fault on their part.
This is simply because they are not involved directly with the engine room operations. And also because for Masters it may not be easy to verify the correctness of oil record entries.
But there are few things masters must do to avoid themselves from situations of false record book entries.
Master’s action would fall in two different categories.
- Actions to prevent false oil record book entries
- Actions on discovering false oil record book entries
Let us discuss both of these actions.
Actions to prevent situations of false oil record entries
We all have heard this phrase. “Prevention is better than cure”.
As I would discuss later in this post, the actions required on discovering false oil record book entries are not so easy.
The best bet to handle false oil record book entries is to prevent these. Masters have an important role in preventing false oil record book entries.
The whole idea of prevention of these situation lies on masters being aware of what is required and then being situationally aware of what is going around on board their ship.
Let us see how this is done.
1. Verify the Seal record
Each company may have different methods to control the Marpol violations on their ships.

But effectively sealing the carefully identified Marpol point is the most basic method that most of the companies use.
Most companies would require the ship staff to maintain a Marpol seal record which has the record of all the seals put on Marpol lines. These may include
- Seals on OWS equipment
- Seals on flanges of lines of the IOPP tanks
- Seals on overboard valves
- Seals on emergency overboard and suction line and valves
- Seals on sludge overboard line, valves and flanges
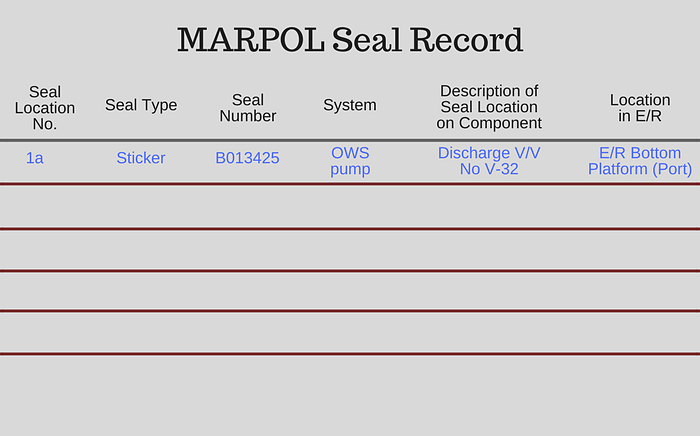
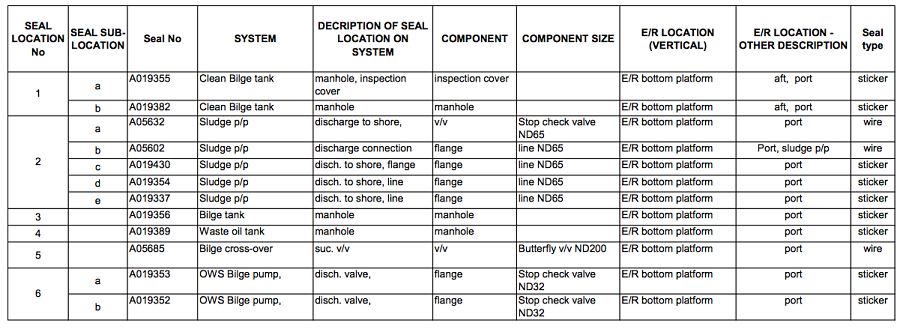
This is the most basic version of Marpol seal record. Few companies require ships to maintain an elaborated seal record.
For example Fleet management has a good format of seal record. They also have the seal management in their PMS system.
Most of the companies require masters to maintain this seal record. It is Masters who have the inventory of seals with them and it is Masters who issues the new seals to the chief engineer when required.
This puts the master’s role in the picture and masters must get themselves involved in ensuring compliance with Marpol.
As a first step, Master upon joining must personally check the correctness of this seal record.
Masters must also verify that the required locations are effectively sealed. By effective sealing I mean that it should not be possible for anyone to remove the seal and repaste it. Or it should not be possible to tamper the seal without anyone knowing about it.
But what if your company do not have the requirement of maintaining seal record ? Least a master can do is to suggest that to the company in the Master’s review.
2. Know the Amount of sludge produced
Masters must be aware of how the sludge produced is handled on their ship. The first step in doing that is to know how much sludge is suppose to produce and how much sludge is actually produced.
There is this 1% rule for the production of engine room sludge.
As per this rule of thumb, the sludge generation from purification of heavy fuel oil is usually not less than 1% of the total oil purified.
This 1% rule is used by many port state authorities specially German port state as the first sign of marpol related violations.
For example in one of the incident, German port state while inspecting a 100000 GT bulk carrier Found the following facts
- As per the 1% rule, the sludge generated should have been 15 Tons
- As per the oil record book, only 2 Tons of sludge was generated in that period
German authorities use this as the first indication of detailed Marpol inspection. In this case bulk carrier was found to be violating number of aspects of Marpol Annex I.
Masters can use this 1% rule to check any irregularities in handling of sludge in engine room.
We must also keep in mind that it is not necessary that ship’s sludge production cannot be less than 1% of fuel oil used.
But it can is a good first indicator of some bad practices in handling of sludge.
Actions on discovering false oil record book entries
As i said earlier, actions in these cases are not so easy. I am being practical here.
But before we discuss that, first let us bring some clarity to the term “false entry”.
There are two type of entries that do not represent the actual picture or facts
- Wrong oil record book entries
- False oil record book entries
Wrong oil record book entry is unintentional. These are the entries that are either
- not made in the format it is required by the rules; or
- date entered is wrong but was unintentional; or
- was the case of typo error
The action required in case of wrong entry is simple. Just ask the chief engineer to correct the entry by Code “I”.
But when we talk about false entry, it is meant to be an entry that is factually wrong and it made intentionally with full knowledge of the fact that he/she is making a false entry.
This is serious crime. Now let us divide the term “False entry” in two broad categories
- Pollution false entry
- Non-pollution false entry
Actions on discovering a Non-Pollution false oil record book entry
Non-pollution false ORB entry is the one where a false entry is made but there is no pollution involved.
Case : Transfer of Oily waters/Sludge from IOPP tank to non-IOPP tank
This could be one of the case where oily waters/Sludge is transferred from IOPP tank to non-IOPP tank and the fact is not recorded in the ORB.
There is no pipeline connecting IOPP tanks to a non-IOPP tanks. If this transfer was done, it has to be intentional and not by a mistake.
The transfer would most likely be with the use of welden pumps and loose hoses.
If this fact is not highlighted in the oil record book, this would be falsification of record with no actual pollution involved.
In this case Master must inform the company and ask the company to inform the flag of the vessel.
Company also need to advise the flag about the proposed remedial action and inform the flag again when remedial actions has been completed.
The email from the company to the concerned flag may look something like this.
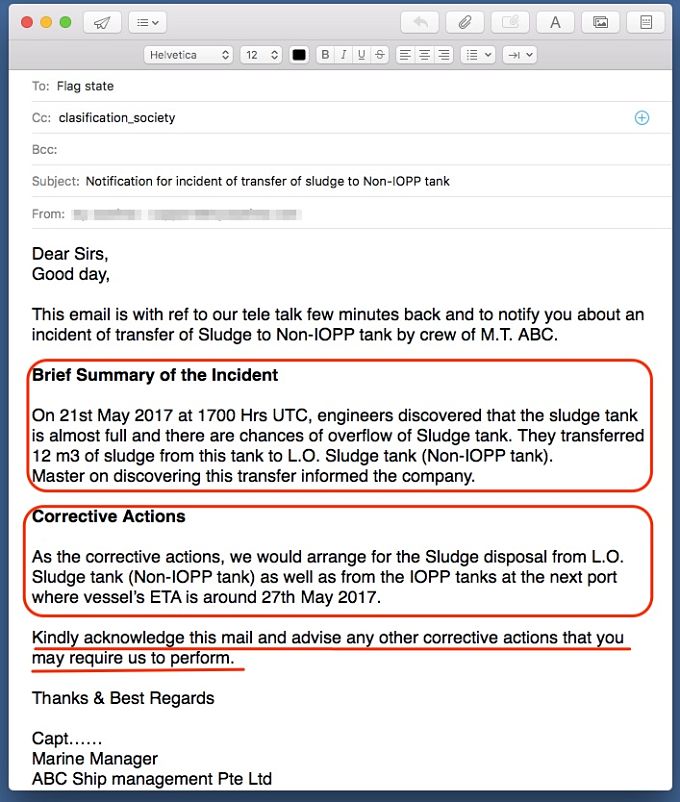
Flag state would ask to make the entry about this transfer in the oil record book and send them the scan of this entry.
Chief engineer can then make the correct entry in the oil record book and send the scan to company. Company will send the scan of this entry to the flag.
On completion of the corrective action (Disposal of the sludge ashore), entry need to be made in the oil record book.
Master will forward to the company the scan of the oil record entry of the disposal of the sludge to shore facility.
Company need to forward this email from master to the flag as the evidence and confirmation of completion of corrective actions.
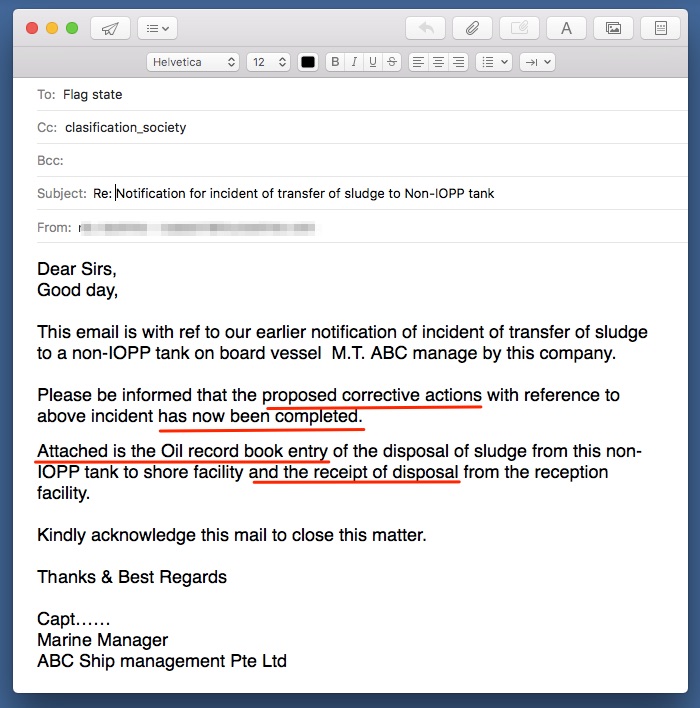
This communication with the flag can be kept in the oil record book for future reference. This will close the case with no further implications.
Actions on discovering a false oil record book entry that involves pollution
Now let us come to a case where some crew members are involved in the illegal disposal of the oil and in oil record book this disposal is shown as legal disposal.
On paper the action required from a master in this case looks too simple. Inform the company, inform the flag, inform the port state and do not sign the oil record book.
In realty, though these are absolutely correct steps but for a Master all these steps are not simple.
Master would be seen with a bad eye by everyone involved. Don’t be surprised if even the company want this matter to be buried. In this case master may find himself in the center stage of everything.
One thing that the Master must understand. When a master is aware of an illegal discharge and he does not inform and record this, he becomes the party to this illegal discharge. It is that serious.
But before a Master jumps to what is required, these are few things he must do.
Talk to chief engineer
One thing the master cannot afford is misunderstanding and mis-communication. It is so important to clarify the matter with the chief engineer.
Master need to be sure that there is actual case of Marpol violation.
Now let us see few cases which master can expect in these situations
Case: Chief engineer agrees to the Marpol violation with explanation
Chief engineer may agree that there is Marpol violation but has one of these explanations.
Explanation # 1
It is just the water with no oil content in it.
Explanation # 2
The water we are throwing out at sea without using OWS is cleaner that the ballast water you have been deballasting inside port.
Explanation # 3
Bilge water is generated from the muddy sea water and OWS gives alarm as OWS detects it as oil even when there is no oil in it.
Irrespective of how logical the explanation might look, the operation which is not as per MARPOL is illegal.
For example even if the bilge water is cleaner than ballast water, it need to be discharged through OWS. This is because Marpol has set the conditions for discharge for bilge water and not for ballast water.
We are just supposed to follow Marpol and not question it.
Master in this case has to inform the company and company has to inform the flag. When such reporting originates as voluntary reporting by the company, more often than not there are no punitive measures taken by the flag.
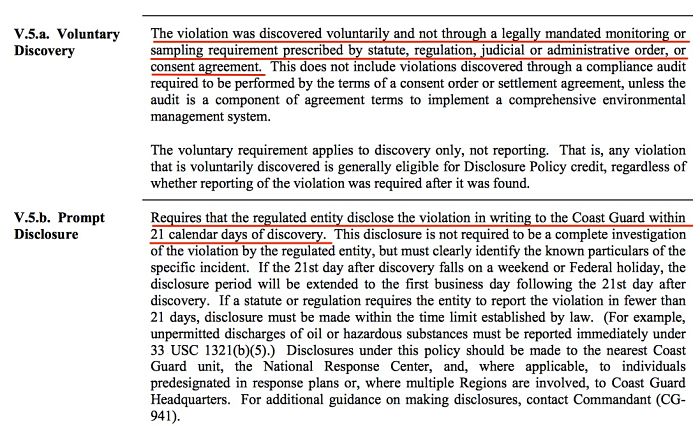
For example, USCG has a voluntary disclosure policy where by there will not be any criminal proceeding provided
- The disclosure is made to USCG voluntarily and
- The disclosure is made within 21 days of discovery of marpol violation
 Conclusion
We all have a duty to follow rules and international regulations. Not out of compulsion but as a culture.
Other wise too, technology has made great advancements in the shipping and it is really tough to hide a violation. For example European ports uses cleanseatech to monitor the discharge of oil at sea.
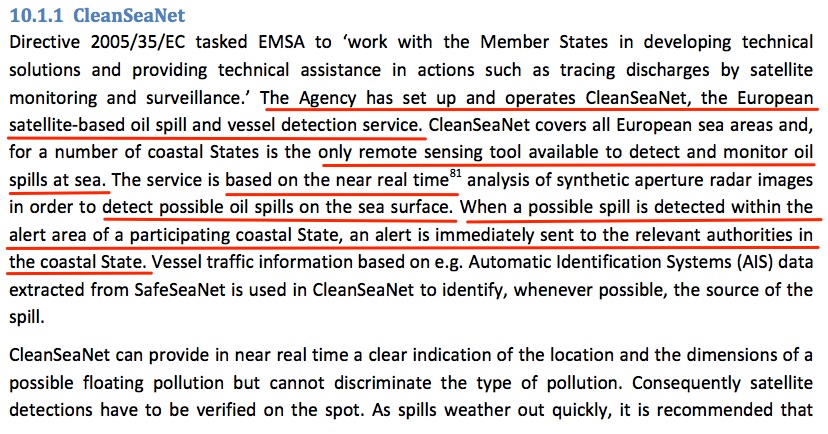
CleanSeaNet is the satellite based oil spill and vessel detection service. This can detect even the minor oil sheen in the water and the alert reaches the authorities in less than 30 minutes.
On detection of a Marpol violation, Master will have a tough job. But they have to do it the way that is right.
Position Fixing: The Most Important Element of Passage Planning
Heavy traffic, extra Look out posted, hours of darkness. Suddenly the GPS is gone !!! Ever experienced this ?
Believe me when it happens, you start doubting each and every equipment. Even the ones which may be working fine at that moment.
Is the gyro giving correct heading ? Is the echo sounder showing correct depth ? You will doubt everything !!! That’s not good.
You will loose the sense of direction. And you would have tiny amount of time to regain the sense and act in a way that is right.
The entire navigation depends upon knowing the position of the ship. This is one of the most important task of a navigator.
But when I say position, I do not only mean GPS position. There are many other ways of plotting the ship’s position. And as with the situation of GPS failing, we must be ready to switch to other methods of position fixing.
Before we proceed with discussing these methods, I must discuss a term which is so much a part of passage planning. The term is “position Fixing Interval”.
Position Fixing Interval
“Position fixing interval” is the maximum interval between two position fixes. So if in a particular section of the passage, we have agreed to the PFI of 01 hour, we must plot the ship’s position at least every hour.
But how do we decide the position fixing interval ?
For that just think why do we need to plot the position ? We plot position to be sure that we are on our track and not drifting towards a danger.
With that logic in mind, let us take an example.
I plot a position at 0800 Hrs. The agreed position fixing interval is 30 minutes. Now just after 0800 Hrs, the vessel starts to draft directly towards a danger.
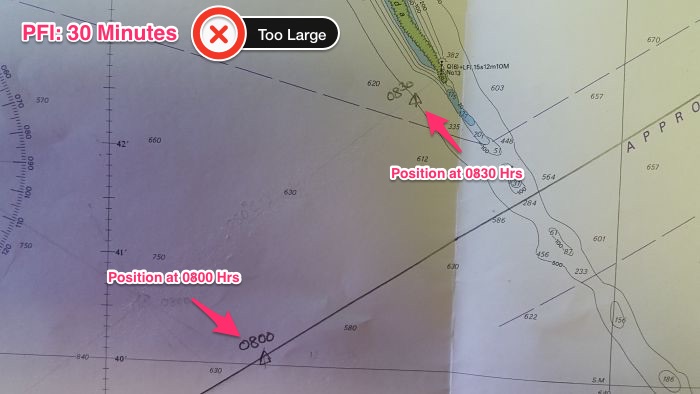
I will only come to know about that at 0830 Hrs when I plot the next position of the ship. If at 0830 Hrs, vessel is at the danger then the PFI was set too high.Because before we could know that we are running into danger, we already were at the danger.
So even if vessel deviates from its course, the interval between two consecutive position fixes should be such that allows time to take the course corrective action.
Method of position Fixes
There are many methods by which we can get a fix of the ship’s position. Some of which are
- Celestial fix by using sextant
- Visual fix
- Radar Fix
- GPS
- Echo sounder
- Parallel Indexing
Primary method of position fixing
One of the element of passage planning is to identify the primary and secondary method of position fixing at each leg of the passage.
There should always be at least two method of position fixing.
Now at open sea, the primary method is GPS and secondary method would be “celestial fix”.
 If there is a radar conspicuous object, the primary method of position fixing becomes the “radar fix”. Secondary in this case would be GPS.
Now if that object is also visible, primary method becomes the “Visual fix”. In this case secondary method will be “Radar fix”.
The idea is that Visual fix gets the highest priority followed by radar fix. And radar fix gets the priority over GPS.
On tankers the vetting inspectors expects that if available visual and/or radar fixes must be plotted at least for the PFI.
For example let us say that the set PFI is 10 Minutes and the agreed position fixing method is Radar and Visual fix. Let us say we plot position at
- 0900 Hrs: Radar or Visual Fix
- 0910: Position by GPS
- 0920: Radar or Visual Fix
This is considered to be wrong and would draw a vetting observation as the radar/visual position is plotted after 20 minutes where as PFI is 10 Minutes.
Celestial Fix using sextant
This method is not so popular during coastal navigation because of few reasons.
One because this method requires some time to know the position because of calculations involved.
Second because there are chances of user induced error (like error in taking the sight). That may not be so nice when ship is navigating in the proximity of dangers during coastal navigation.
But there is a gross misconception about this method among many seafarers. Misconception is that position by celestial observations are not accurate.
Instead, if we can have our hands set perfectly to take accurate sextant altitude, the position obtained by this method are quite accurate.
There are few disadvantages with this method.
Even though this method do not rely on electronic equipments and satellites but it need nature in our favour.
We need clear sky and clear horizon so that we can measure the altitude of the celestial body.
Even when the sky is clear, it is difficult to measure the sextant altitude when ship is rolling.
“How to use sextant to get the ship’s position” is too big a topic to fit in this post and I will write on that in detail on some other day.
Position by GPS fixes
Do I need to say anything about GPS fixes ? Even the supernumaries on board know how to plot GPS position.
This is most over relied method of position fixing. Over relied for a good reason. It is Crisp accurate (most of the time) and quick fix.
On Modern ECDIS, navigators do not need to do anything in plotting the GPS positions. These are plotted automatically at the set interval.
Some ECDIS can even record the ship’s position when it senses change in any parameters like change in course.
For the passage planning we must ensure that PFI is set in the ECDIS, so that GPS positions are marked and recorded automatically in the ECDIS.
To set the PFI in furuno ECDIS, go to DISP -> SET -> and then choose Symbol DISP.
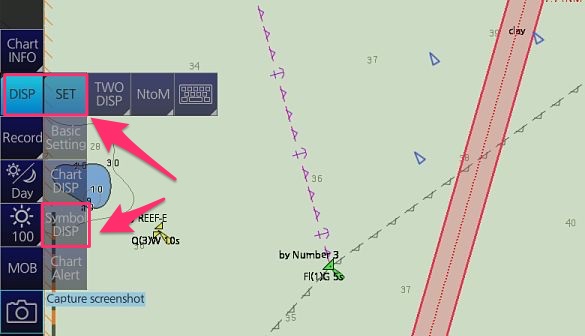
Now go to Tracking. The Position fixing interval can be set under Labels. Once set, the GPS position will be recorded at the mentioned interval.
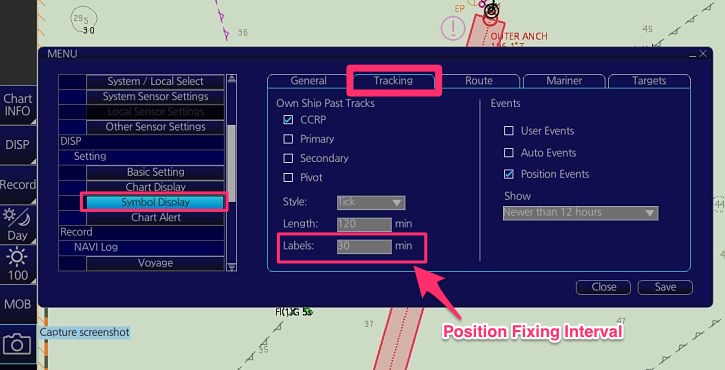
GPS fixes are accurate, no doubt about that. The only issue with GPS fixes is the Complacency and over-reliance. Over-reliance to the extent that we may find ourself unconfortable if the GPS fails.
Radar Fixes
Position by radar gives quite accurate results and must be used whenever we have radar conspicuous objects.
The advantage with radar fixes is that it just needs one object to get the ship’s position. We can get the range and bearing of this object and plot the same on the chart.
For example let us say we get the bearing of this light as 050 degrees and range as 4.4 NM.
We will draw a line of 050 degrees to this light. We will then measure 4.4 NM on the compass and cut the bearing line with this distance.
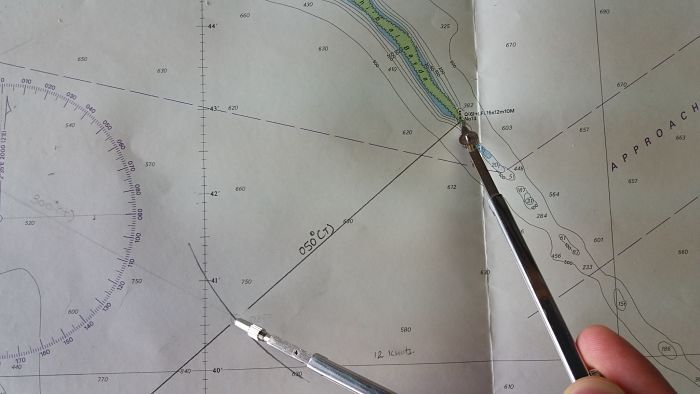
In the same way, if you have two objects, you can plot the radar fix by number of combinations of position lines like
- bearings of these two objects
- bearing of one object and range of other object
- range of both objects
As more and more ships are moving to the paperless navigation, we must know how to fix the ship’s position by radar on ECDIS.
So let us fix the ship’s position on Furuno ECDIS.
Let us say for this island, we get a bearing of 010 Degrees and distance 2.5NM from the radar.
On Furuno ECDIS go to Record -> This will open a position event window. Choose LOP and then choose True-bearing + Distance option.
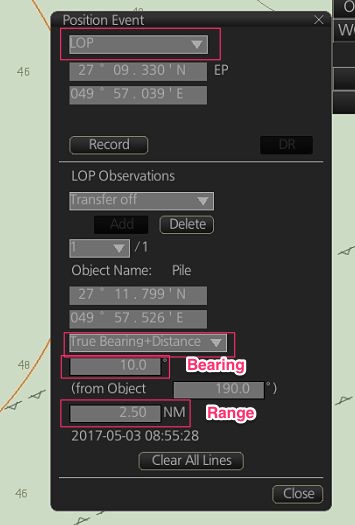
Now click on the point of the island for which the bearing and distance were taken from the radar.
Now enter the bearing and distance in the position event window and then click “Add”.
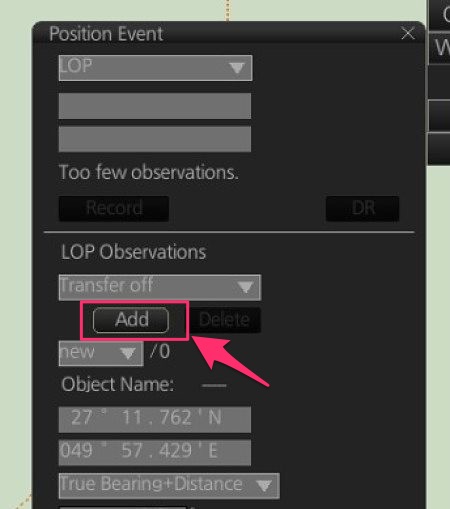
This will give you your position.
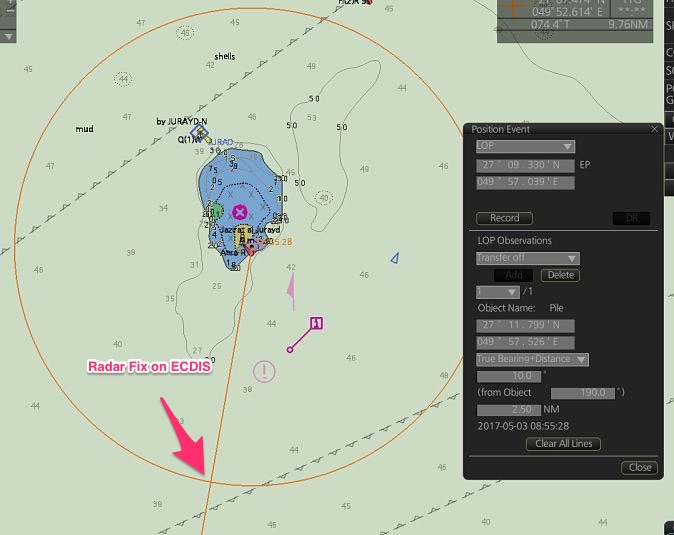
Now if you wish to record this position in the memory of ECDIS, click “Record” in the position event window. The position will be plotted on ECDIS and recorded in the memory.
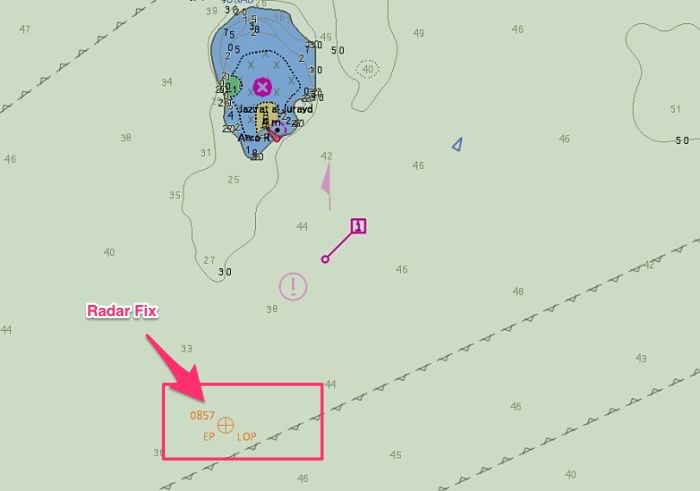
If we have two bearings (or two range) of two objects, the process of plotting radar fix on ECDIS is same as above. Just instead of “bearing + Distance”, choose “bearing” (or distance) option.
Visual Fixes
Visual fixes are least practiced position fixing method inspite of being accurate. All it requires is a visual target and compass for taking its bearing.
Position by Visual bearing of two objects
If we have two objects that are visible from the ship, the bearing of these two can get us the ship’s position.
For a better accuracy of position by two bearings, the two bearings should neither be too narrow nor too wide. Separation angle close to 45 degrees being the ideal one.
To plot the position by visual bearings of two objects, take the bearings of both the objects simultaneously.
Now draw the bearing of these objects on the charts. The point where these two bearings (position lines) intersect will be the ship’s position.
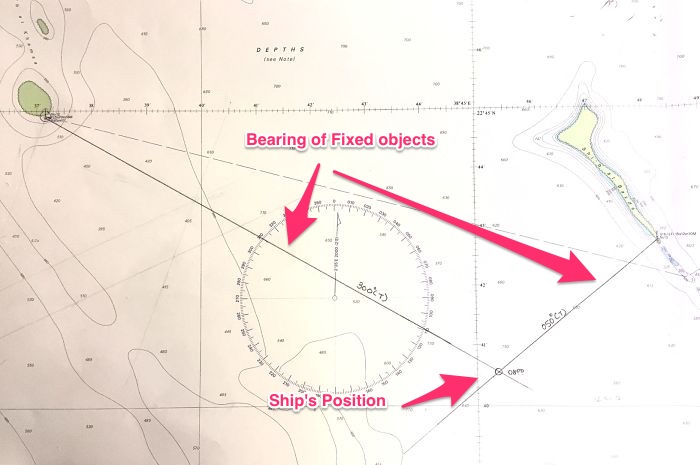
How to do this on ECDIS ?
The process is same what we did for plotting radar fix on ECDIS.
Position by Running Fix
Even when there is only one object visible for visual bearing, we can still get the position. The method is called “running fix”.
In this method, we take the first bearing of this object before when it is forward of our beam. Let us say we see a light Fl 5s 20m 16M. At 2000 Hrs we take its bearing and it comes out to be 020 degrees.
Plot it on the chart. This is the first position line at 2000 Hrs.
Take the second bearing of same object when it is abaft the beam. Say this time we take the bearing at 2020 and the bearing is 300 Degrees.
Plot it on chart. This is the position line at 2020 Hrs.

Now we have two position lines but both are at different times. We need to bring either of these position lines to the same time as the other one.
How do we do that ?
We know our course made good and speed, plot the this on the chart. Now on this course line cut the distance covered in 20 minutes which is the interval between two position lines. Let us name this point as point A.

Now transfer your first position line to the point A. The point where it cuts the 2nd position line is the ship’s position at 2020 Hrs. This is because now both the position lines are at same time.
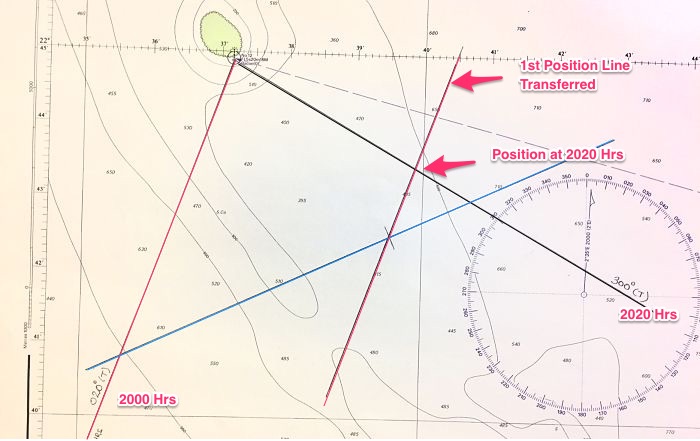
To get the position at 2000 Hrs, draw your course made good from the 2020 Hrs position. The point where it cuts the first position line will be the ship’s position at 2000 Hrs.
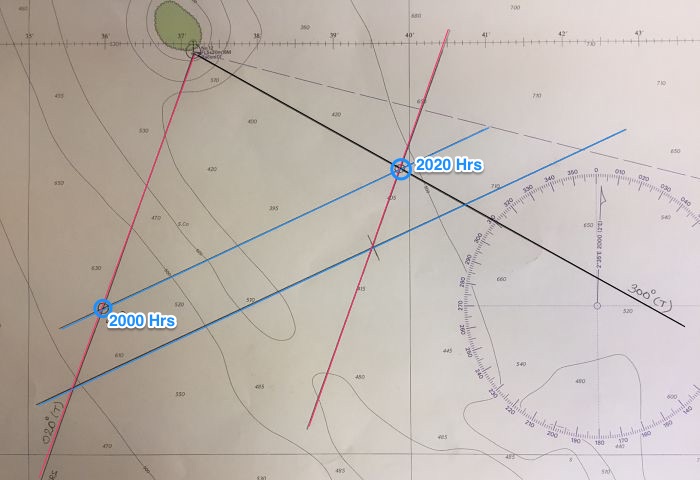
How to get running fix plotted on ECDIS ? Let us plot this on furuno ECDIS.
We take the first bearing of the fixed object and we plot first position line on ECDIS. To do that from the left menu options go to Record -> Event log -> Posn event.
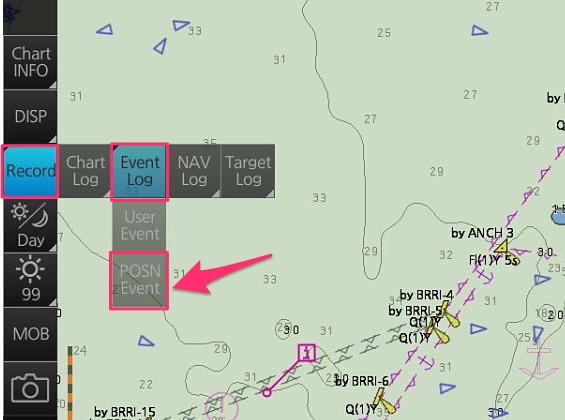
This will show a pop up called position event.
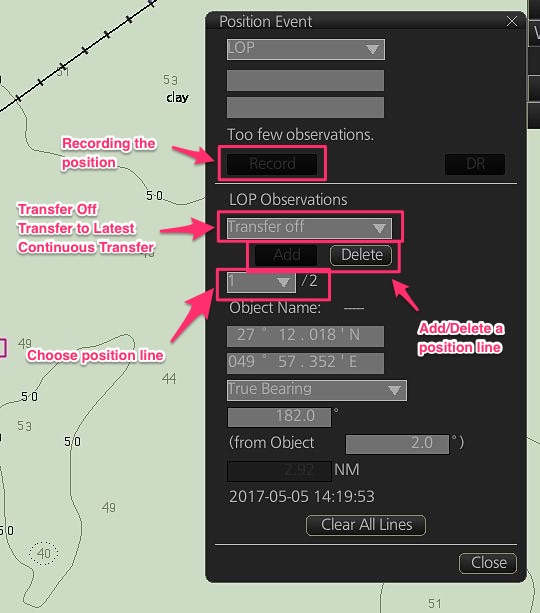
Mark the first position line of the fixed object that you have taken the visual bearing from and click “add” to add the position line.
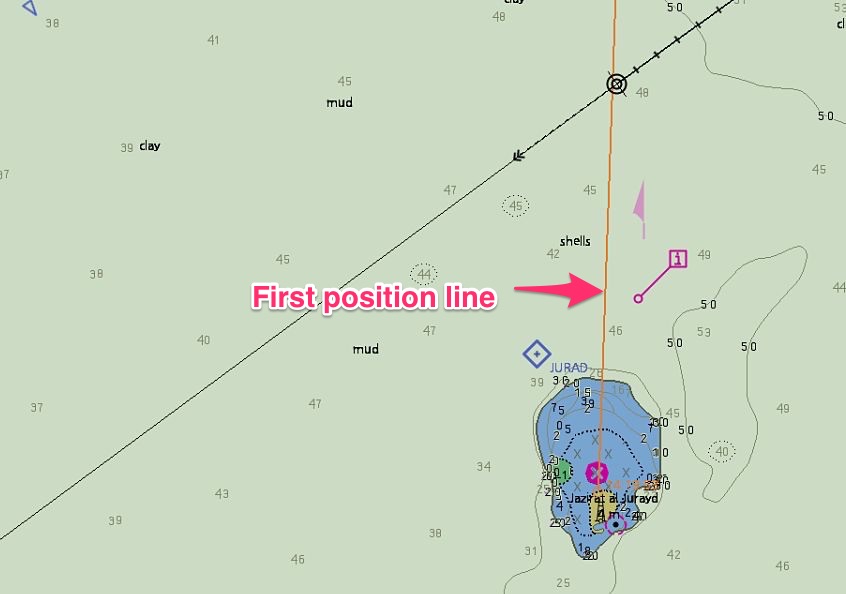
Now when you have the 2nd bearing of the same object, mark the 2nd bearing on the ECDIS in the same way. Make sure the option “transfer off” is slected while marking both the bearing.
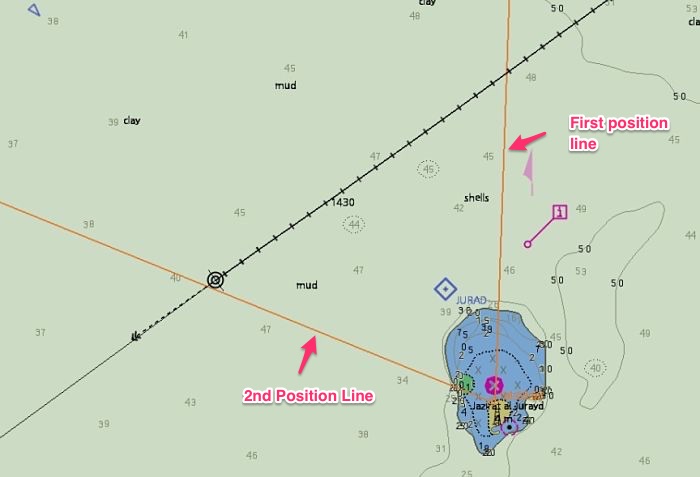
So we have the two position lines but both are at different times. We need to transfer the 1st position to the present time to get a fix by “running fix” method.
To do that, choose the position line number 1 from the position event pop up (under LOP observations).
Then change the option to “Transfer to latest”.
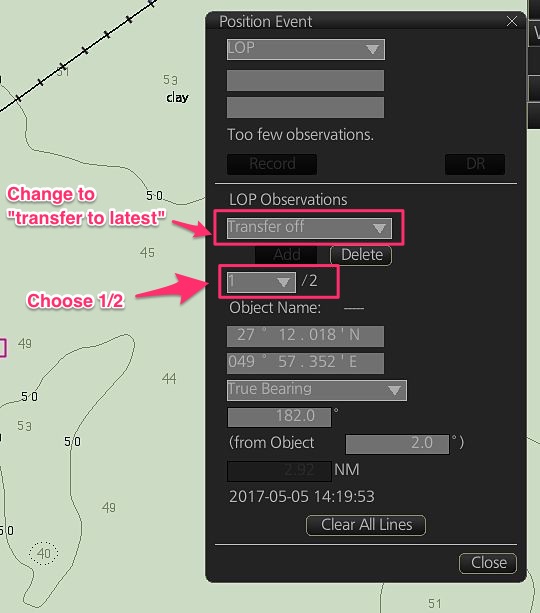
Once we choose “transfer to latest” option for position line # 1, this position line will be transferred to the latest time. You will also see TPL marked on this position line which denotes “transferred position line”.
The position where it cuts the 2nd position line is the ship’s position.
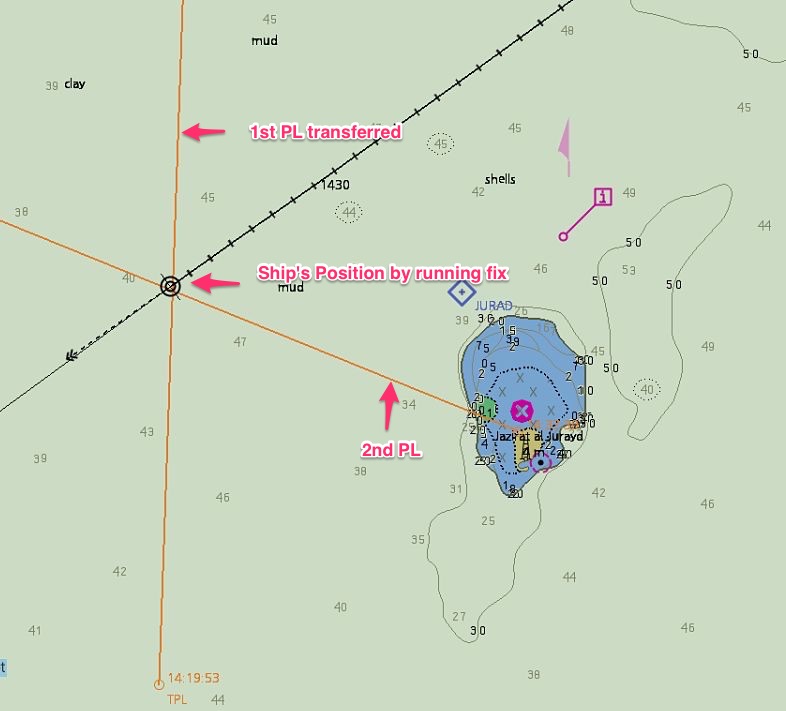
The position where it cuts the 2nd position line is the ship’s position. To record this position in the history data of ECDIS, just click on “record” option in the “position event” pop up. This will mark the ship’s position on the ECDIS and save it in the history data.
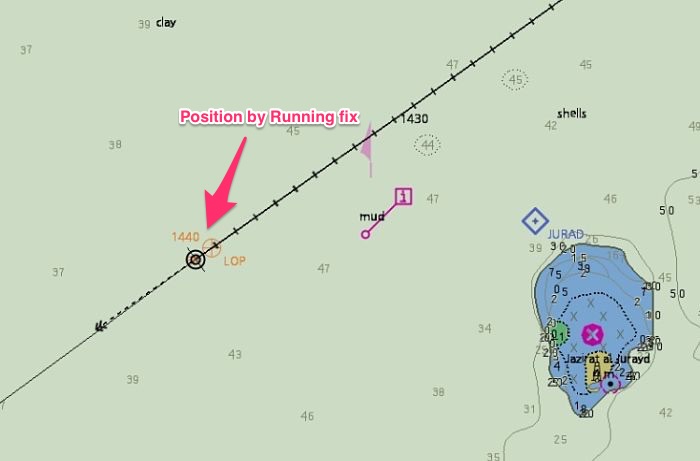
Position by Echo Sounder
I am sure not many discuss this as the position fixing method. Rightly so. We have so many resources and we do not need to rely on echo sounder for position fixing.
But as I said, when the GPS fails we start doubting everything and each equipment. More methods of reassuring us about position can be handy.
Echo sounder cannot be used as a position fixing tool but it can be used to confirm the known position of the ship.
Have a look at this photo. This could be one of the place where we can ascertain our position by echo sounder.
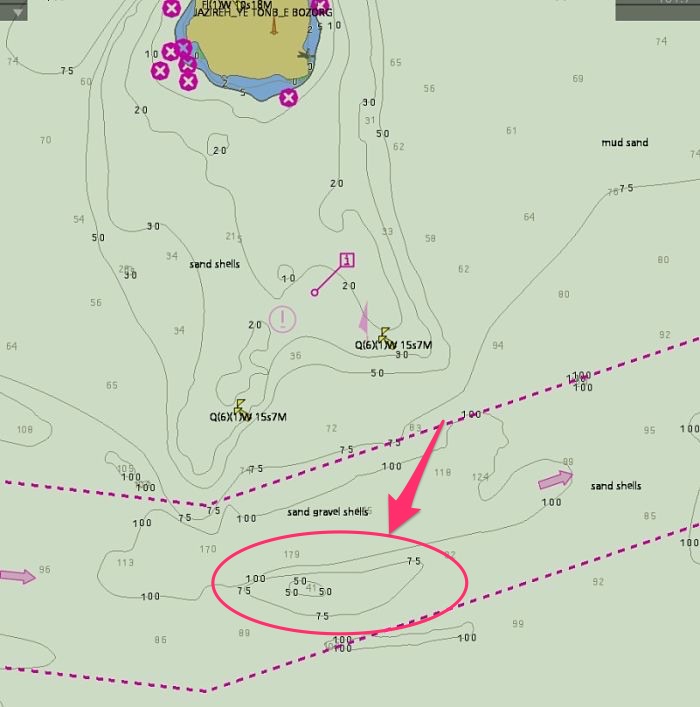
If we see depth of around 40 meters on echo sounder and at the same time we take bearing of the edge of the island that is visible to us. We draw position line from this island.
As there is only one point on this position line where the depth is expected to be around 40 meters, this will be our estimated position.
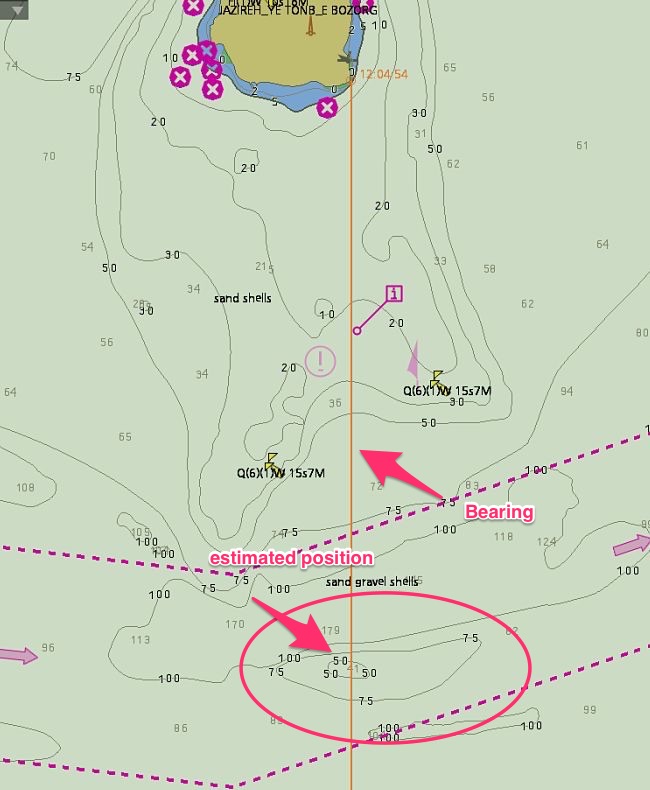
As I said this is not the position fixing method. But we can use this as a confirmation tool for the position we get from other methods.
Parallel Indexing
We earlier discussed that the interval between two position fixes should be such that between any two fixes, the vessel must be safe.
But this would mean that during arrival into a port, we need to plot our position every 60 seconds.
Many, including some third party inspectors may insist on this but this is crazy. Imagine plotting the radar fixes every two minutes.
Sometimes even the chart would not be of such large scale that can distinguish the two positions plotted at two minutes interval.
I feel PFI of less than 5 minutes is not practical. So how do we ensure ship does not run into danger if PFI need to be less than 5 minutes and we plot the position every 5 minutes ?
The answer is by “parallel indexing”.
We identify a fixed object and draw a line parallel to our course. We then monitor the echo of this object on the radar.
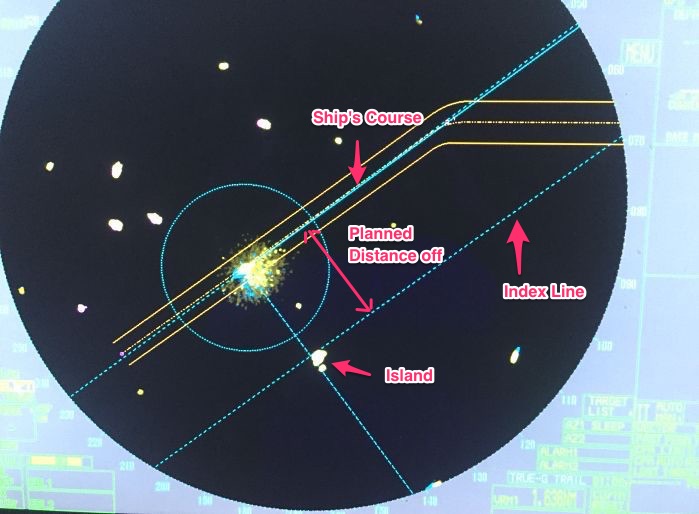
If the echo stays on the line drawn parallel to the course, we are on our course. If the echo deviates from the line, we are off track and we must alter the course to bring the vessel on track.
This is a method which ensures continuous monitoring of the ship’s position.
In the situations where PFI comes out to be less than 5 minutes, we can set the PFI as 5 minutes and then monitor the ship’s position by parallel indexing and plotting the position every 5 minutes.
Parallel indexing is a fantastic tool for monitoring the ship’s position. For this reason, it must be used wherever a radar conspicuous object or landmark is available.
Conclusion
There is one basic requirement that a navigating officer on watch need to fulfil. At all times he must know
- Where we are, and
- Where they (other targets) are
Sadly most of the groundings happens because we either do not know one of these or both. If we know all the methods of plotting and then confirming our position, we will never miss out where we are.
With now more and more ships going paperless, we must also transform ourself to be able to use these methods on ECDIS.
How to Install ENCs on Furuno ECDIS- Step by Step Guide

Honest Question: Do you like navigating on paperless ships ?
I am not usually a betting man, but I’d wager that you love sailing on paperless ships. It makes the navigation so much easier.
More than navigation, it makes the tedious process of correction of paper charts less cumbersome.
I am big fan of ECDIS and I believe that our Industry need to expediate in producing more advanced navigation data.
By more advanced data I mean, where all the correction to the ENCs would be possible with just one click. The navigators will then concentrate more on something that they are suppose to do: NAVIGATION.
But while we wait for the advanced data amagement for ECDIS, we must know the present ECDIS procedures.
Right now the process involves more than few clicks,instead it is a process.
I have earlier written about importing ENCs for JRC ECDIS. And I wanted to cover more makes of the ECDIS.
So in this post I will cover the process of ordering ENCs using Chartco and then installing it on Furuno ECDIS.
Let us start !!!
Step 1: Know what ENCs you require for your Voyage
The first step is to shortlist the ENCs that you would require for your next voyage.
Let us assume that right now the ship is at Jubail. The next voyage is to Singapore. And we need to check & order the ENCs for this voyage.
For this open the Chartco, passage manager and click on the Start-Main menu.
Choose “Routes and Passages” options from the menu items.
Input the “From” and “To” ports and click on “Calculate Route/Distance”.
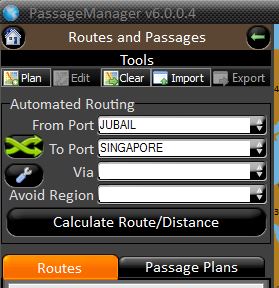
This would give you the route for the voyage (in our example route from Jubail to Singapore).
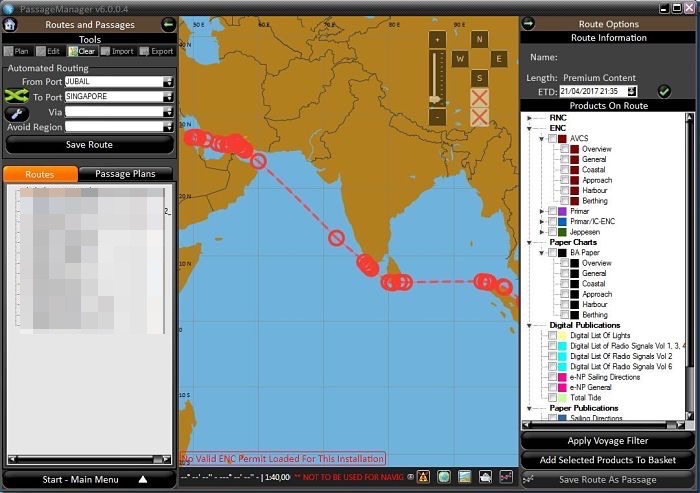
Now from the right panel, tick the ENCs starting with “Berthing”, then “Harbour” and then moving upwards.
If you select all the ENCs together or if you start from “overview” and move downwards, it would be difficult to identify large scale ENCs. In this case there would be chances of missing to order ENCs.
Now say I select “Berthing” and then “Harbour”. Now I can see ENCs which are on my voyage.
The cells (ENCs) which we already have, will be shaded as green. So we do not need to order these ENCs.
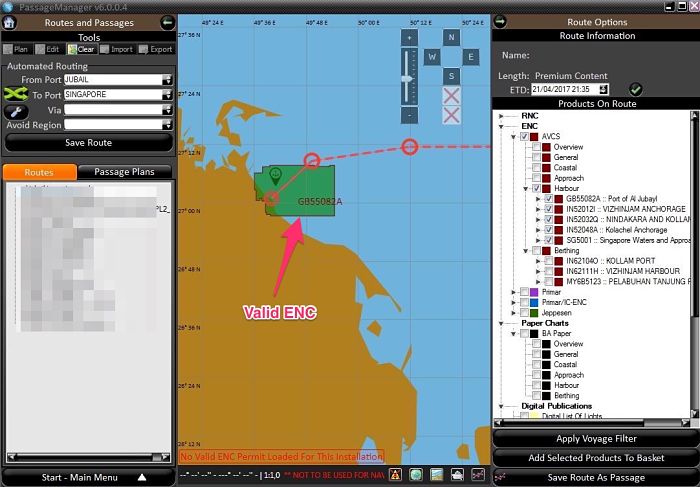
The cells (ENCs) which we do not have will be shaded red and these are the one that we need to order.
Once we have identified the ENCs that are on our voyage and shaded red, select the ENCs by single click on it. The selcted ENC will have the yellow border.
Now we need to add these ENCs to the basket. To do that either
- right click, choose “add to basket” and then “Highlighted products”. Or
- Just click on the “Add selected products to basket”
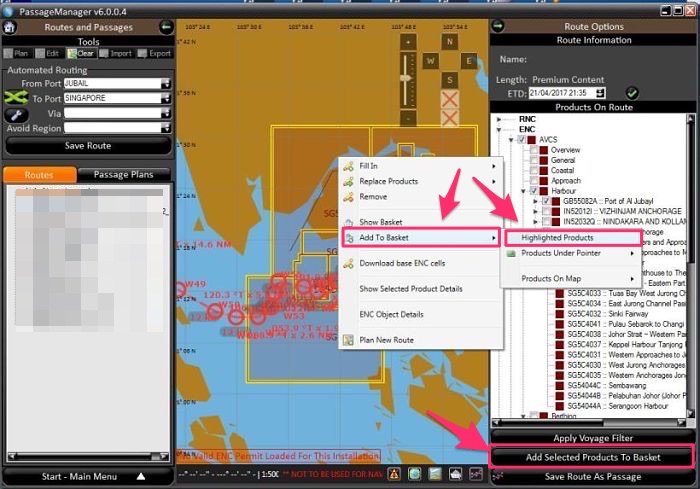
Follow same procedure with all th ENCs you require by clicking on “Approach”, “Coastal”, “General” and “Overview” ENCs.
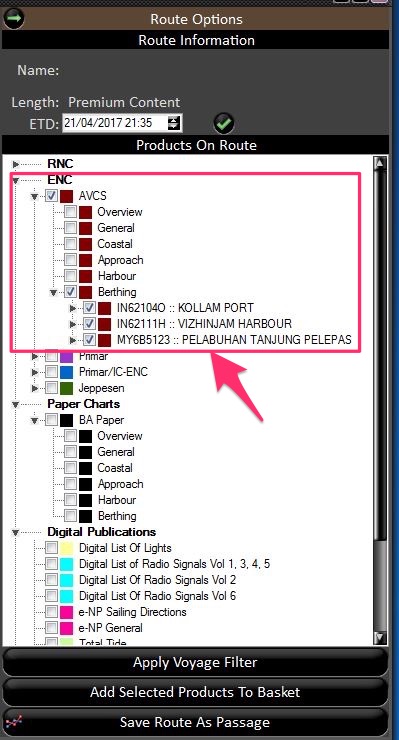
Once you have added all the required ENCs to the basket, the summary of ENCs added to the basket will show at the bottom of the screen.
Select all the ENCs in the basket and click on “Create order”.
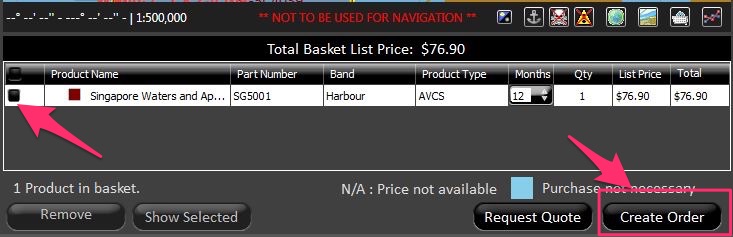
This will open up a pop up. You can either click on “Export” or just “Ok”. Clicking on export will save the order file at a location choosen by you. Clicking on “Ok” will also save the order in chartco.
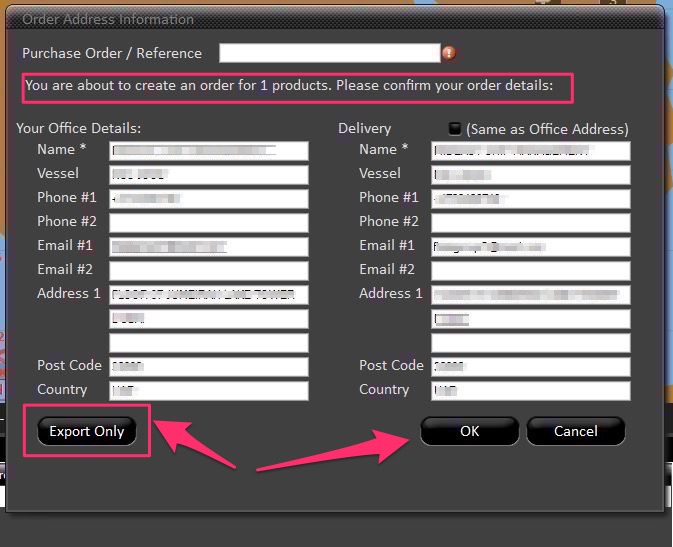
Let us say we click on Export. It will prompt us for a location to save the files. We can save these files in a folder on desktop.
We have now created an order or ENCs from the chartco.
Step 2: Send the ENC request to your ENC provider
Once you have selected the ENCs required for your voyage, you can request those ENCs from your ENC provider.
To do that, just email the order files saved from the Chartco. Follow your company procedures of sending these file. Let us say you can send request the ENCs directly from the supplier.
Then send a request for ENCs to the supplier by email and the request files as attachment.
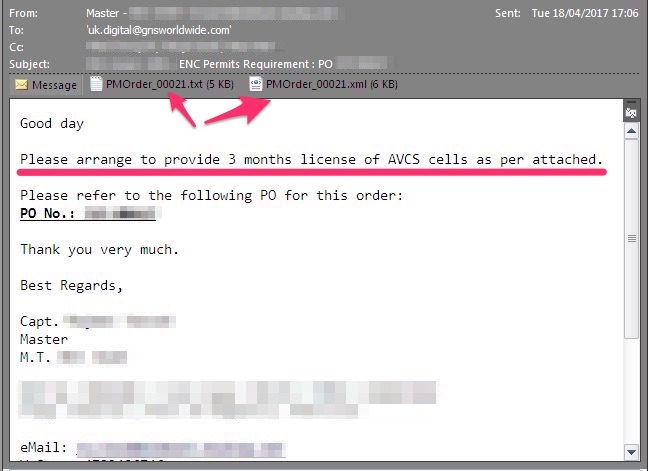
If it is not weekend, you should receive the email containing ENC permit for the requested ENCs.
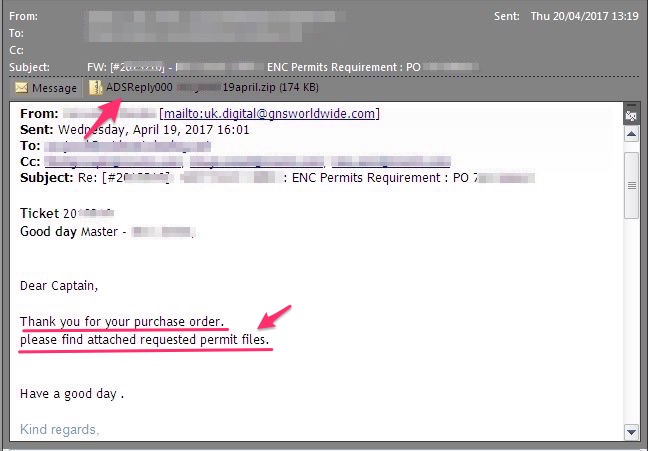
Step 3: Import the ENCs to the ECDIS
Now you have received what you wanted. The permit file for the required ENCs.
The next step is to import this into your Furuno ecdis. To do that first extract the zip file received from the ENC provider.
Copy the permit folder into a USB flash drive.
Go to ECDIS and insert the USB flash drive in the ECDIS USB slot.
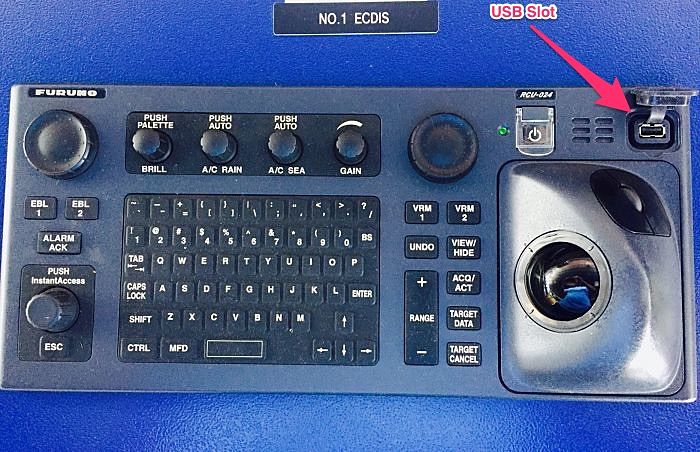
Now on Furuno ECDIS, click the “Chart” tab. Now click on the “Chart” tab. Then go to “Licences” on the left menu bar.
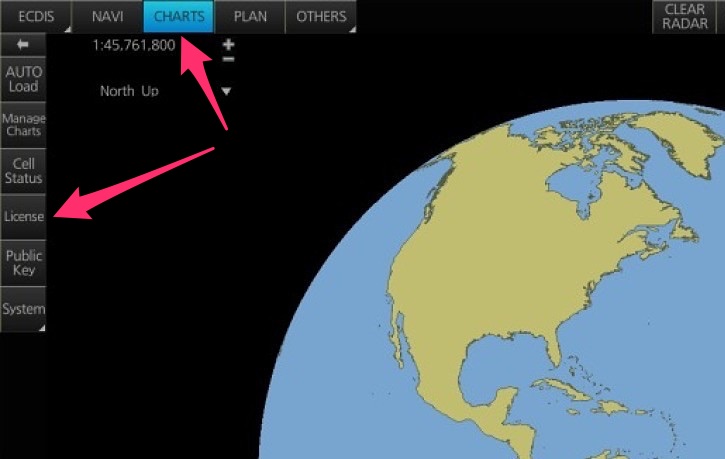
This will open the License status of all the ENCs installed in the ECDIS.
Click on “Install License”
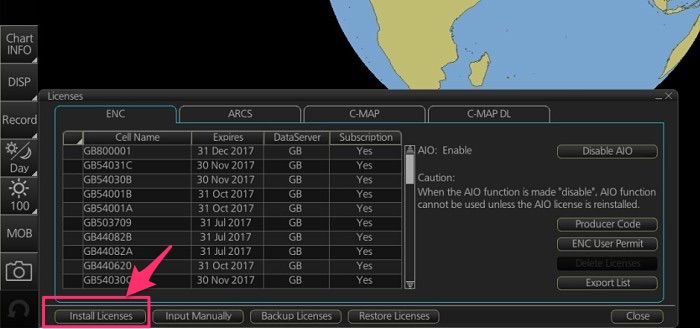
Choose the path to the USB and then to the “permit.txt” file.
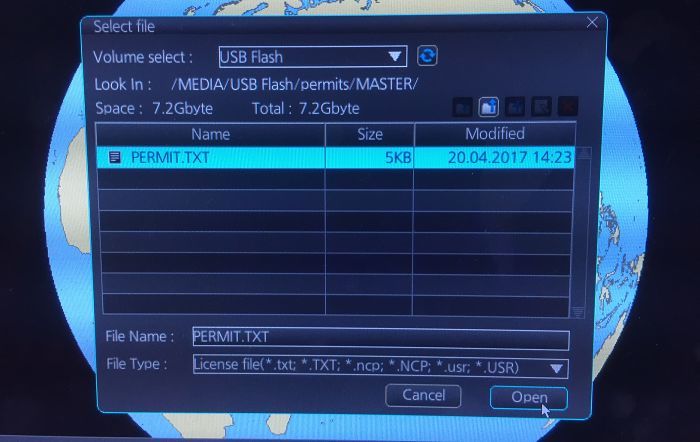
This would install the ENC permit into the ECDIS.
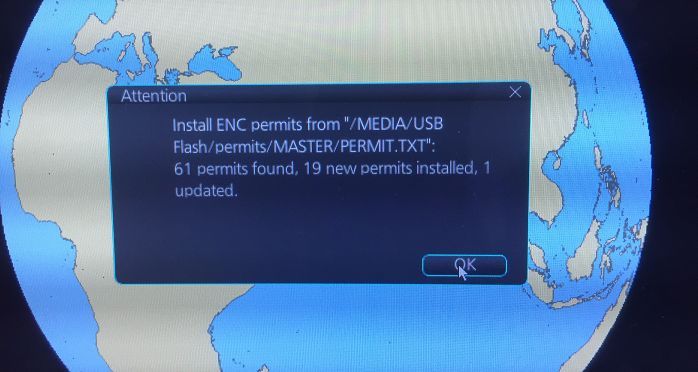
You have now installed the ENCs into your ECDIS successfully. But that alone is not enough. You need to follow the next steps too.
Step 4: Update the permit in Chartco
We have loaded new ENCs in the ECDIS. We need to update the new ENCs in the Chartco inventory. This is important as chartco inventory of ENCs need to match with actual ENCs we have in the ECDIS.
To do that, insert the same USB drive containing permit file in the chartco computer.
Go to ENC outfit through Home -> ENC -> Outfit.
To update the permits in the chartco, click on the “Import from permit” tab at the bottom right of the screen.

Specify the permit folder (in the USB drive) and import the file into the chartco.
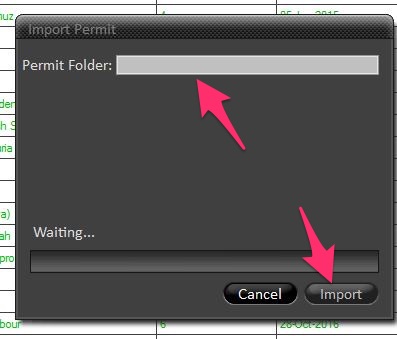
This will import the ENCs into the chartco and the inventory of ENCs is updated in the chartco.
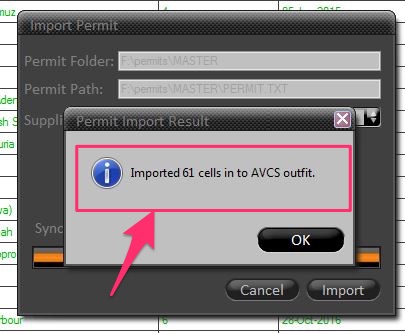
Step 5: Check the status of the Cells
Now that we have installed the new ENCs into your Furuno ECDIS, we need to check the correction status of the cells.
For that while being in the “Chart” mode, click on the “Cell Status” option on left menu bar.
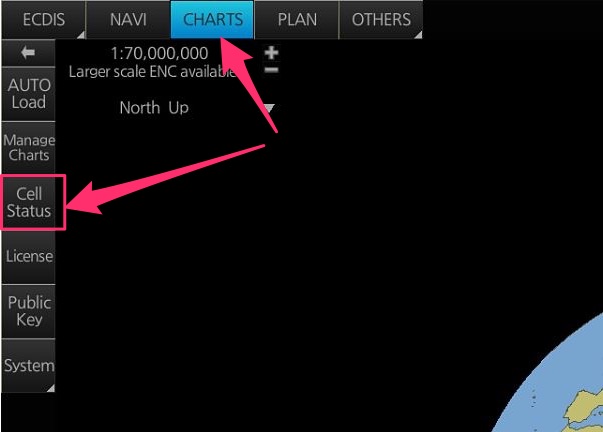
This will show the status of each cells. The status can be viewed as text and also by color coding in the displayed world map.
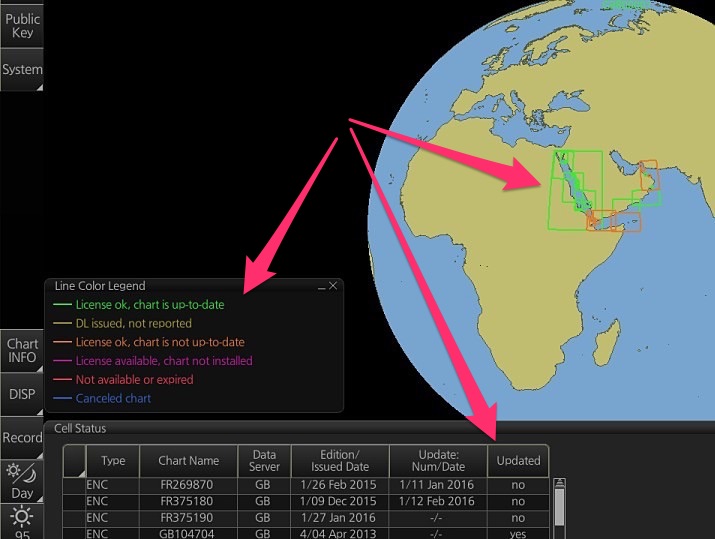
If all the ENCs are up to date and are coloured green, that is good. If not we must follow the next steps to update the ENCs with all the valid corrections.
Even if the ENCs are updated, it is recommended to follow the next steps.
Step 6: Load the latest base cell DVD
Now that ENCs are installed in the ECDIS, we need to apply the latest base cell DVD that ship has.
To do that, insert the DVD into the DVD drive of the ECDIS.
Click Auto-Load and choose the DVD location from DVD drive.
It will update the base cells of the new ENCs to the week of the DVD.
Step 7: Collect the corrections from the Chartco
The base DVD that we applied to the ECDIS also comes with the corrections. But usually the base DVD will not be of the latest week.
For example the base DVD on board could be of week 06/2017 where as the latest week may be 17/2017.
When we applied the base DVD 06/2017 to ECDIS, we have
- Corrected the newly installed ENCs upto week 06/2017, and
- updated the new edition of any base cells of newly installed ENCs
We now have to correct these ENCs to the latest week, 17/2017. And by correcting I mean,
- Weekly corrections upto week 17/2017, and
- Update the base cell of any of these ENCs, which has the new edition issued after week 06/2017
If any of the base cell has a new edition, a message will be displyed after importing permit into the Chartco (As per step 4).

If you do not have the recommended disk, you need to download the base cells. I will come to that in a few minutes.
For now, let us collect the corrections from chartco. To do that,
Go to Home -> ENC -> choose “Corrections” option from the right menu bar.
This will show you the pending corrections for the ENCs. From the bottom of the screen, click “Collect and transfer to ECDIS”.
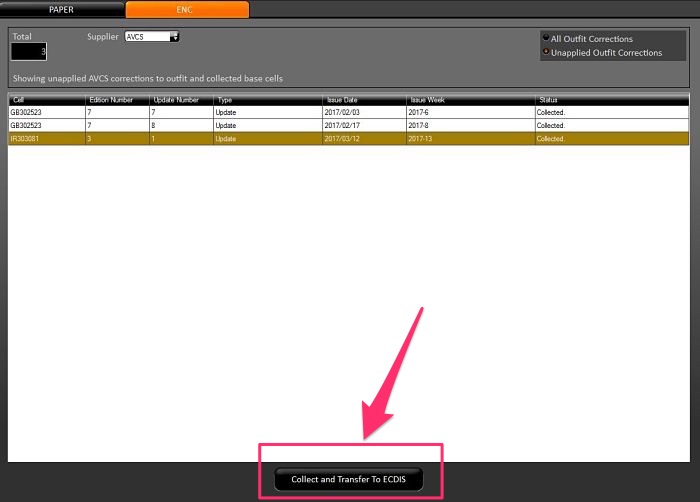
Now if there are any ENCs that has new editions, it will show you a pop up for that.
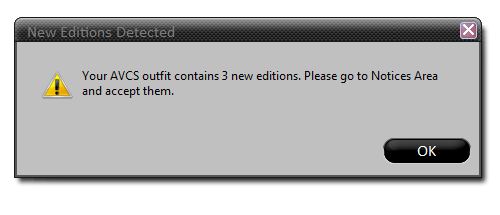
Once you click OK, it will take you to the notice area. This notice area will show you the detail of the ENCs for which new edition (new base cell) is released.
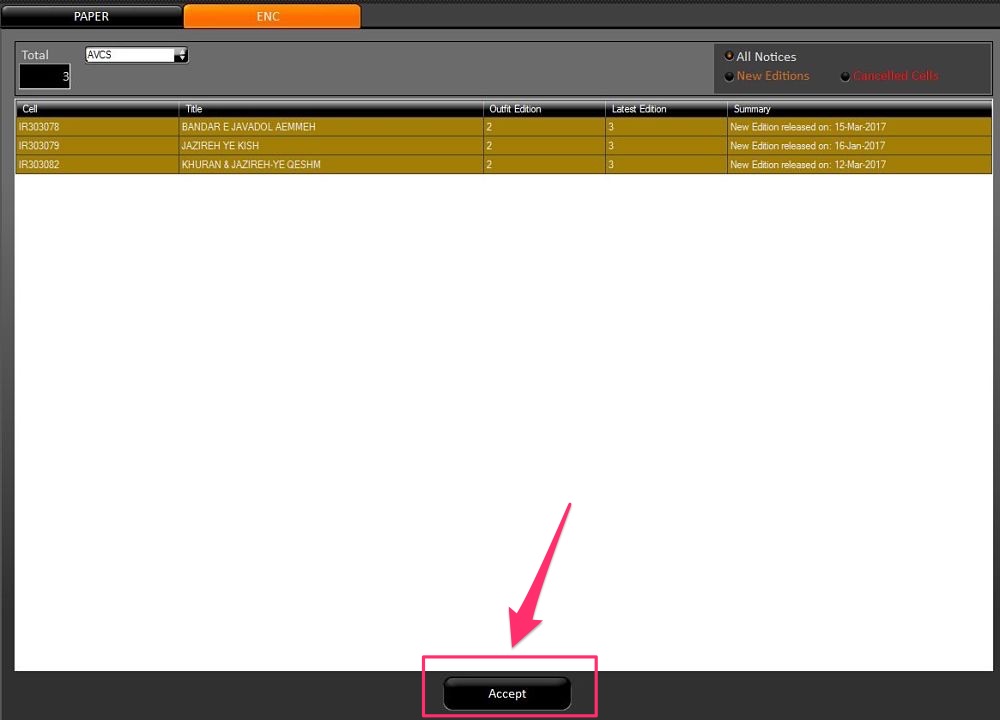
Now you will see “Accept” tab at the bottom of this notice area. Accepting this tab means that
- we are telling chartco that ECDIS is already updated with latest base cells of these ENCs,
- if not, we can choose to accept and then download the base cells for these ENCs
Even when you click on “accept”, it will give you a warning pop up.
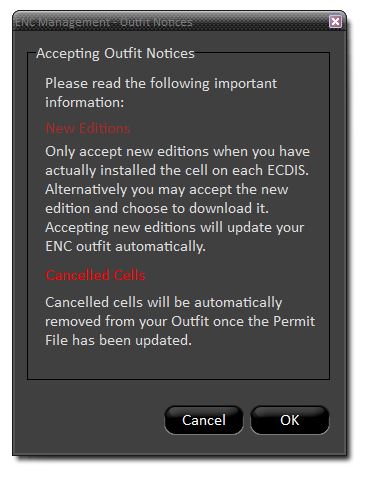
When you click “Ok”, it will give you an option to download the base cells.
If the chartco computer is connected to the internet, it will download the base cells right away.
But if this process is through the email client like “Outlook”, clicking on download will send the request for base cells through email.
For this make sure that before you click on “Download”, the email client (for example outlook) is open on chartco computer.
In this case you need to wait for the email from the chartco server containing the requested base cells.
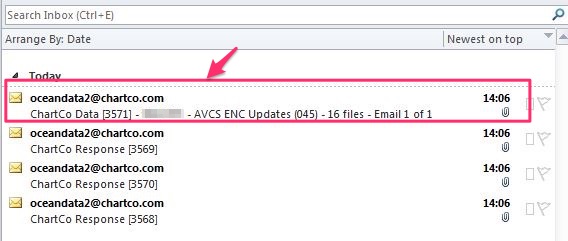
Once you have received the email, click on the “check for new update” from the home screen of chartco. This will get the chartco to import the base cells from the email.
Now you have the base cells and few corrections that need to be transferred to the ECDIS.
And since now you have downloaded the required ENCs base cells, you can again click on “Collect and transfer to ECDIS” from the corrections tab on chartco.
Choose the location (USB drive) of saving these corrections and then click “Write to Media”.
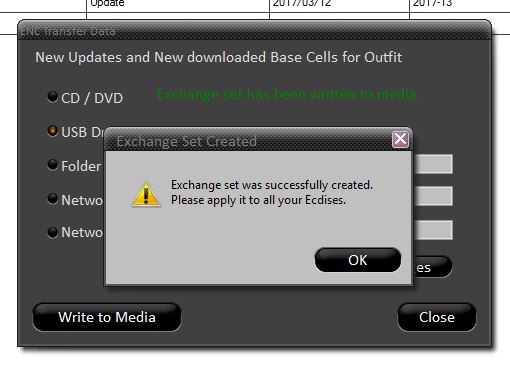
Once you have saved it to the USB drive, the corrections are ready to be applied to the ECDIS.
Step 8: Apply the corrections and base cells to the ECDIS
We are now into the final step. We need to apply the collected base cells and corrections to the ECDIS.
To do that, connect the USB drive to the ECDIS.
Go to Chart -> Auto Load
Point it to the USB drive and then click OK. All the base cells and corrections in the USB will be applied to the ECDIS.
Conclusion
I agree that getting new ENCs into the ECDIS and then correcting these should not be a tedious process. It should just happen in few clicks.
As the technology is reaching on the ship, that would be reality soon. But till then we must know the exact procedure of receiving new ENCs and updating these to latest corrections.
How to make correct oil record book (Cargo) entries ?

Ask any tanker mate what the #1 nightmare of sailing is. And they’ll probably tell you it is to be in the center of oil pollution inquiry.
That’s a nightmare: to be in that position, facing oil pollution inquiry.
And yes, it makes sense as the consequences of such inquiry can be severe.
But you know what !! If you are not at fault, chances are that you will escape spot free.
But there is something you can never escape spot free.
And that is incorrect oil record book entries.
The severity of the consequences may vary. For example if there is deliberate attempt to make a wrong entry in oil record book, the consequence would be severe.
And if there are some typo or calculation errors, the consequences could range to some monetory fines.
But wrong oil record book entries will never go spot free.
And there is a reason for that. If you made some wrong oil record book entries, you alone are at fault. No one forced you to make such entry.
Oil pollution can be an incident but not wrong oil record book entries.
That makes it so much important to make absolute correct entries in the oil record book.
But to be able to do that, there are two things you must possess.
- Seriousness in making these entries
- Knowledge of how to make these entries
More often than not, you can fathom the seriousness by merely having a look at few pages of the oil record book.
If the handwriting is shabby and alphabets are flying around, seriousness is not shown in making these entries.
And believe me when I say that poor handwriting has nothing to do with it. I have seen mates with poor handwriting making the entries in capital letters to compensate for their poor handwriting.
But even if you are super serious about it, you still need knowledge of “how to make oil record book entries correctly”.
There is Intertanko guide on this but there are many grey areas left unanswered in this guide too.
First the guide is not comprehensive and second there isn’t explanation of many doubts that seafarers usually have while filling up the oil record book.
In this post, I will try to plug all these gaps by going through all the practical situations we face during oil tanker cargo operations.
So lets start.
1. Loading of cargo
Most common entry in oil record book is the Loading of cargo. The columns that we have to fill are these
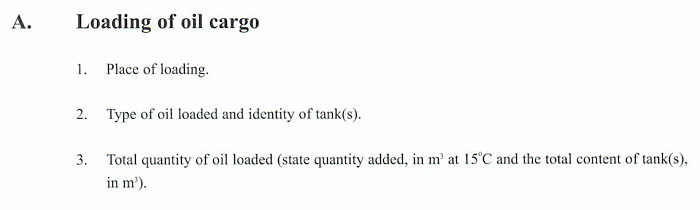
There should absolutely be no confusion for A-1: Place of loading. But when writing the place of loading, not only write the port but also the berth number or the accurate location inside the port.
A-2: Type of oil loaded and identity of tank(s) is also not confusing.
A-3: Total quantity of oil loaded (state quantity added in m3 at 15 C and total content of tank(s) in m3
This is where all the confusion and wrong entries exist.
First point to consider is that all the quantities in A-3 need to be in m3 at 15 C.
While I personally do not agree with this. For example read what MARPOL require for A-3 to be written as.
A3: Total quantity of oil loaded (State quantity added in m3 at 15 C and total content of tanks in m3).
It does not ask the total content of tank to be in 15 C. But in the Intertanko book, under example for “loading of cargo entry” it gives the total content at 15 C.
To avoid any misunderstanding, I therefore recommend to write both the quantities at 15 C.
Now let us consider few of the conditions.
Condition 1: Loading one grade at one port
Load port: Rastanura, Berth # 3
Cargo: Gasoline
Loaded in tanks: 1W, 2W, 3W, 4W, 5W, 6W
Quantity loaded: 52000 m3 at 15 C
The cargo entry should look like this
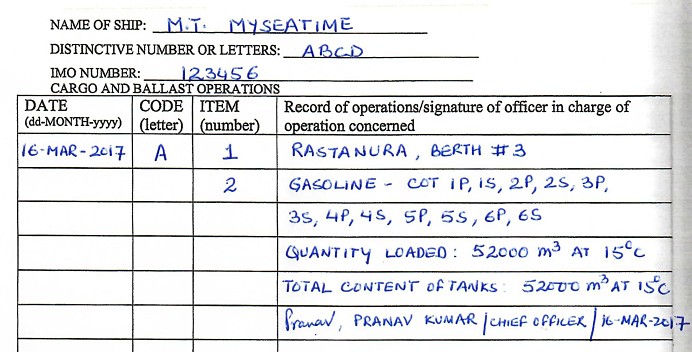
But there are few errors that we make frequently.
For example can you spot the error in this entry (actual entry from a ship’s Cargo record book) !!

First only total quantity is mentioned and not the quantity loaded and total quantity in the tank.
Second, the entry itself is ambiguous. No one can tell if the “Total quantity” mentioned is the Quantity loaded” or “total content of tank”.
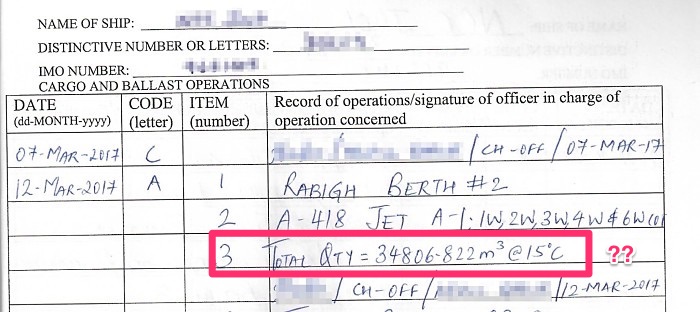
But there is another version that I see sometimes. Recording the two quantities as “Gross volume” and “Net Volume”. See below actual example.
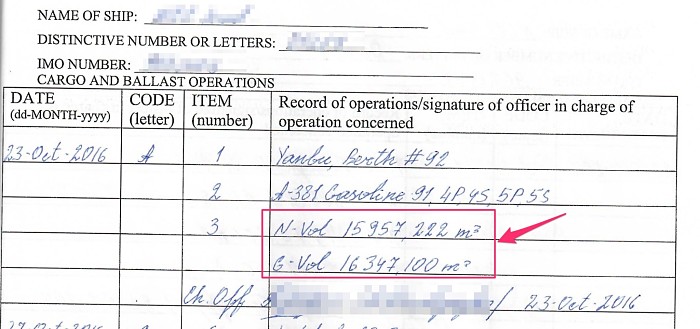
Now there are multiple errors in recording the quantities and thus many unanswered questions.
- Net volume at what temperature ?
- Net volume & Gross volumes: Cargo loaded or total cargo ?
Condition 2: Loading two or more grades at one port
The guidelines for filling up individual rows like A-1, A-2, A-3 remains same. But even when all the data is available, there is still one error that I see too frequently.
But before I come to that, let us take this example
Load port: Rastanura, Berth # 3
Cargo: Gasoline
Loaded in tanks: 1W, 3W, 5W, 6W
Quantity loaded: 35000 m3 at 15 C
Cargo: Diesel Oil
Loaded in tanks: 2W, 4W
Quantity loaded: 10000 m3 at 15 C
The ideal entry in cargo record book will look like this.
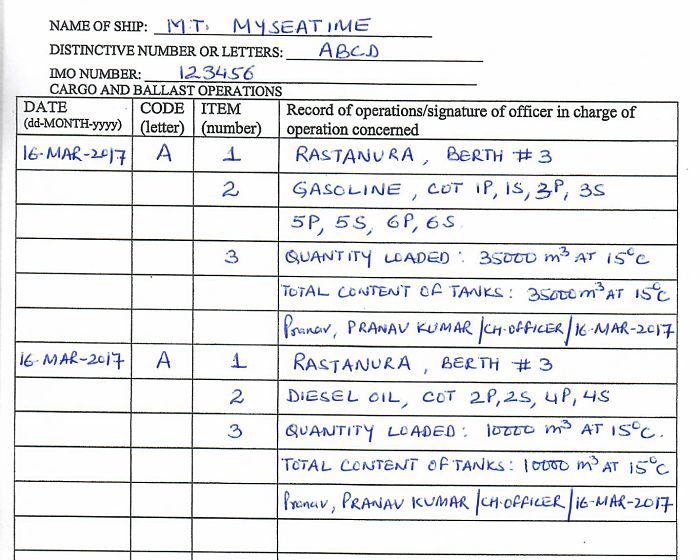
The idea is to make different entries for each grade even if the cargo was loaded at the same berth of the same port.
I have seen sometimes we try to make a common entry for all the grades loaded at same port. The result is not so nice looking.
For instance see below actual entry for loading two grades.
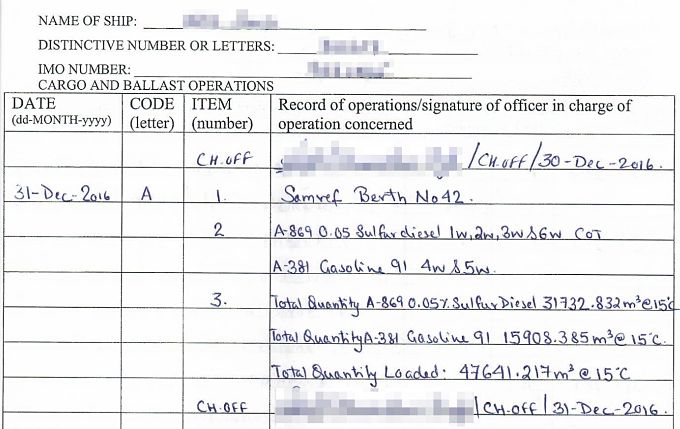
It has information about total quantity loaded but not the total content of the tanks.
It is really a bad idea to try to merge both the entries in one.
A big confusion in these type of entries is the “total content of the tanks”. Is it total content of the tanks being loaded for this cargo or total content of all the tanks of the ship ?
You may not find this clarification from any of the reliable sources. But if we go by the logical thinking, it need to be the “total content of tanks loaded in cargo tanks of that particular entry”.
Condition 3: Loading at more than one ports
The entry for loading at more than one port is no different than what we already discussed in condition 2.
Let us take an example
Load port: Rastanura, Berth # 3
Loading Date: 16 March 2017
Cargo: Gasoline
Loaded in tanks: 1W, 3W, 5W, 6W
Quantity loaded: 35000 m3 at 15 C
Load port: Jubail, Berth # 42
Loading Date: 18 March 2017
Cargo: Diesel Oil
Loaded in tanks: 2W, 4W
Quantity loaded: 10000 m3 at 15 C
The cargo record book entry should look like this.
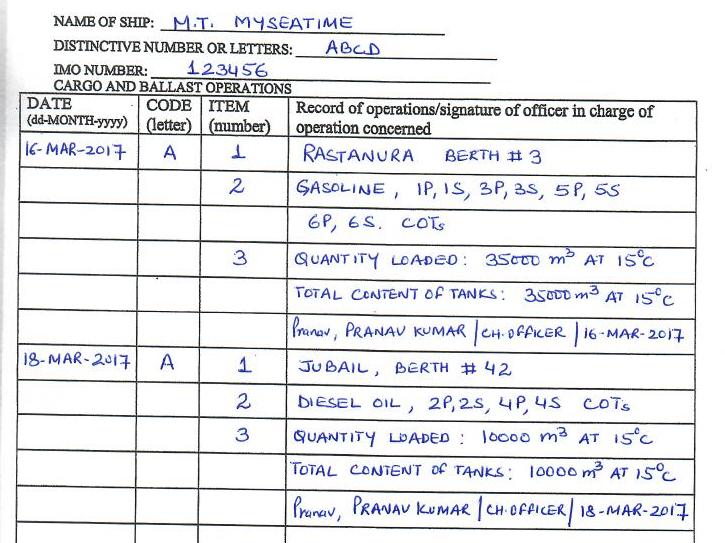
As I clarified earlier, the total content of the tanks need to be the total quantity in the tanks mentioned in that particular entry.
Other conditions on Loading of cargo
Once we are clear on the first three conditions that we discussed, we are good to go for any other combination.
For example once we are clear, it is not difficult to understand and make correct entries for “loading multiple grades in multiple ports.
2. Unloading of Cargo
This is most easy entry in the oil record book. The columns that need to be entered are
Let us see how we actually need to fill this data.
Condition 4: Unloading full cargo at one discharge port
Here is an example
Unloading port: Mumbai, Berth # 9
Unloaded from tanks: 1W, 2W, 3W, 4W, 5W, 6W
Quantity loaded: Full cargo
The ideal entry would look like this.
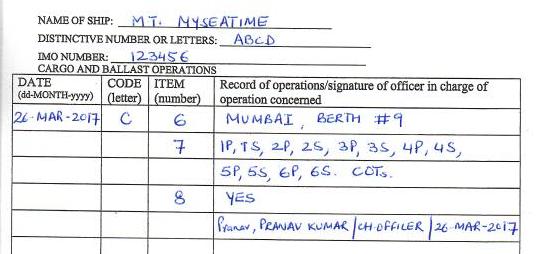
Sweet and simple, right ?
For row C-8, I see sometimes we write it as “Yes, all tanks Emptied”.
Nothing wrong in this but why add extra words ? I recommend to keep it simple. Just “Yes” is perfect.
Condition 5: Unloading at Multiple discharge ports
Let us take up an example for this situation too
Unloading port: Mumbai, Berth # 6
Unloaded from tanks: 1W, 4W, 6W
Quantity loaded: Full cargo from these tanks
And
Unloading port: Kochi, Berth # 12
Unloaded from tanks: 2W, 3W, 5W
Quantity loaded: Full cargo from these tanks
This again is not that complicated. By this time you already know how this entry would be ?
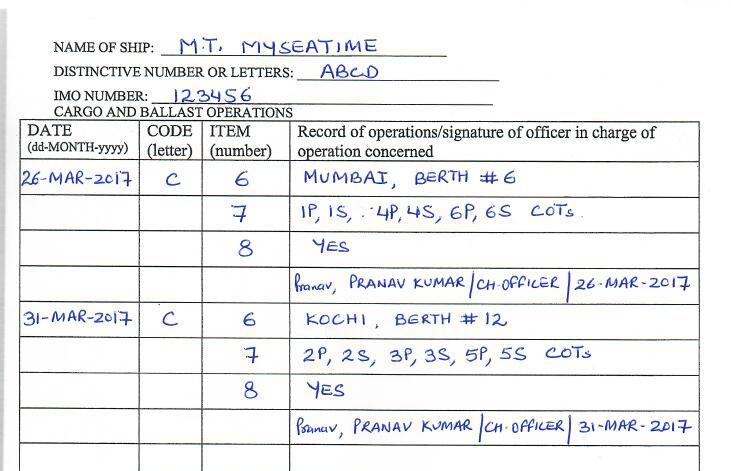
Condition 6: Unloading part cargo at Multiple ports
This is little bit trickier than unloading of cargo by emptying the tanks.
Loaded tanks: 1W, 2W, 3W, 5W
First Unloading port: Mumbai, Berth # 6
Tanks unloaded from: 1W, 3W, 5W
After unloading: 1W, 5W were emptied and 3W was part discharged. Total of 4000 m3 was the balance in 3W after unloading.
The entry for this operation will be this one

Now after Mumbai, vessel went to Kochi to discharge balance cargo
Second unloading port: Kochi
Tanks unloaded from: 3W, 2W
After unloading: 2W, 3W were emptied
For the second discharge port the entry will look like this.
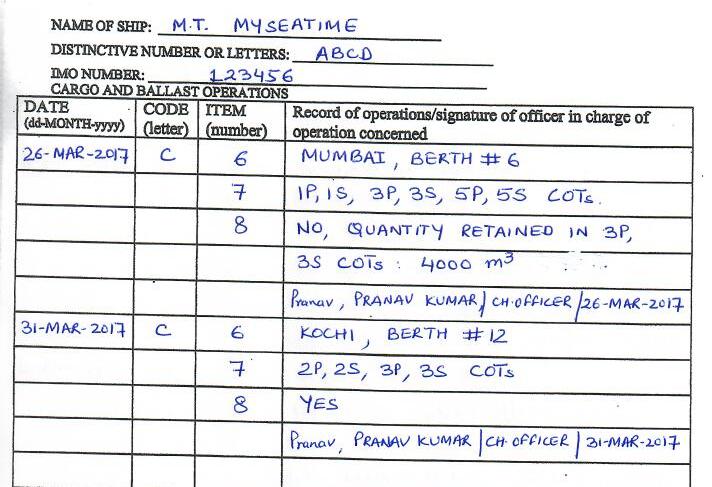
3. Cleaning of Cargo tank
This is another common operation specially on product tankers. For change of grades, we sometimes need to clean the cargo tanks.
The oil record book entries required for this operation are
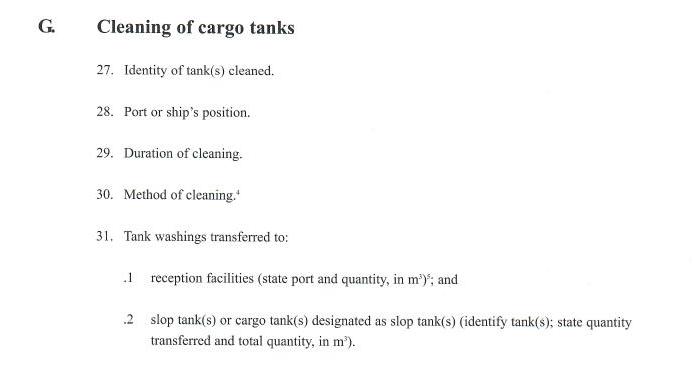
Let us see an example of how each row need to be filled in cargo record book.
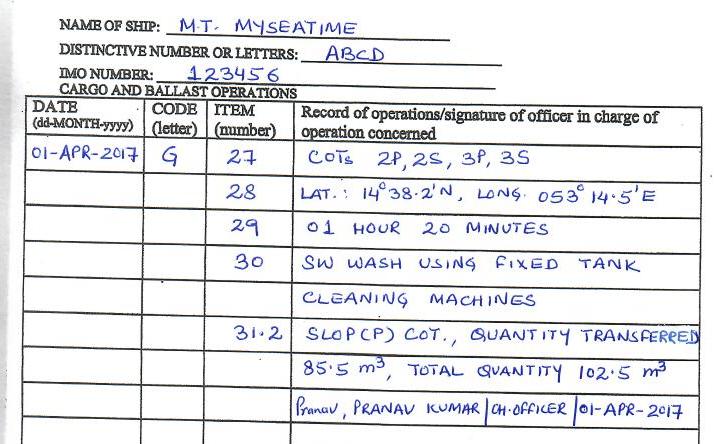
There are few things that I must clarify in this entry.
Date of entry is the date when tank cleaning operation of the mentioned cargo tanks was completed and not the start date of tank cleaning operation.
Ship’s position entered in G-28 is the position where tank cleaning operation was started.
Few mates while making this entry write both Commenced tank cleaning position and completed tank cleaning position. Nothing wrong in that but it is again an extra undesired information.
The reason no one is interest so much in positions and start stop time is that all the washing are required to be on board.
Another thing is the duration entered in G-29 which is the total duration of cleaning of the mentioned tanks.
It is good practice to make different entry if the tank cleaning was stopped for considerable period.
For example let us say that on one day tanks no 1W, 2W, 3W were washed and then on the next day morning 4W and 5W were washed.
In this case we should make entry of washing 1W, 2W, 3W for one day and then next day for 4W and 5W.
If you still wish to make one entry only then the duration of cleaning should be calculated as the total duration for which tank cleaning machines were running.
The accuracy of this information should be supported by the port log record.
4. Discharge of water from slop tank into the sea
When we have done the tank cleaning of the tanks, we can discharge the tank washings collected in the slop tanks through ODME.
To be able to do that certain condition of Marpol Annex I need to be fulfilled.
But when these washings are discharged to see through the ODME, we need to make an entry in oil record book of this fact.
The items to record under this entry are
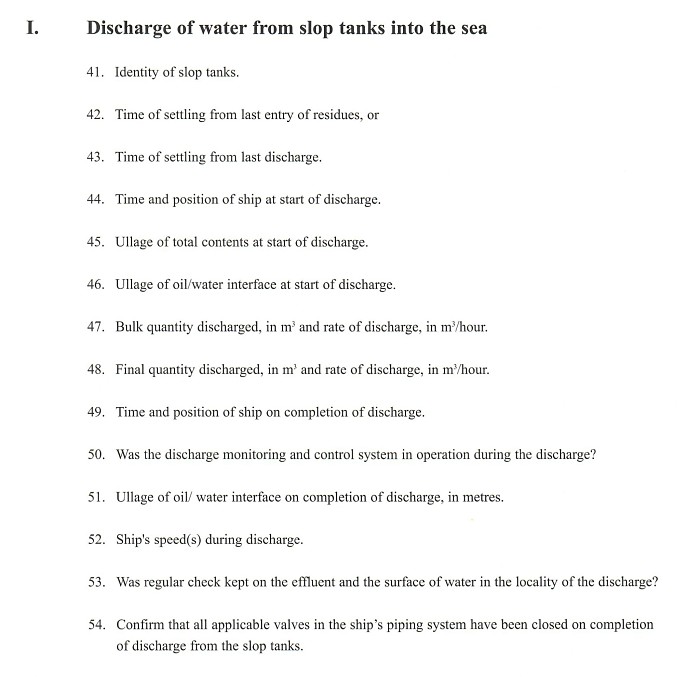
Let us see how we need to make the entry for discharge of water to the sea.
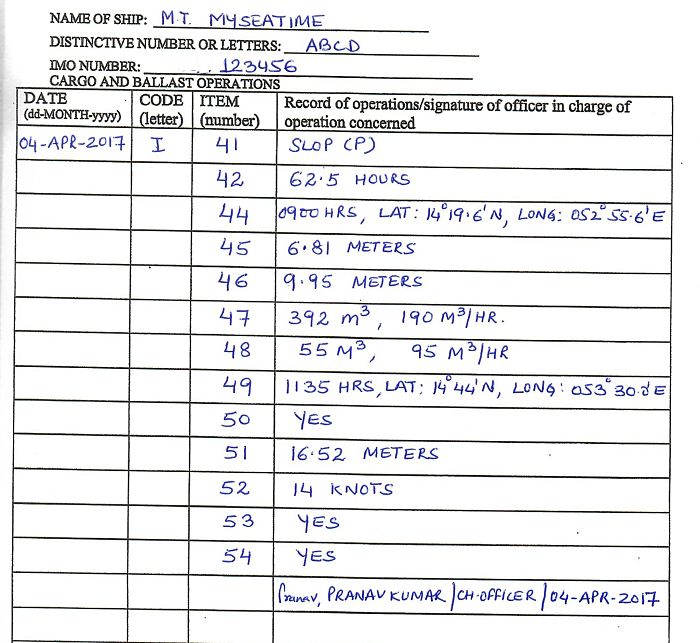
Let us see how we need to make the entry for discharge of water to the sea.
In this most of the sections are quite straight forward and do not need any explanation. But few sections may be confusing so here comes the clarification.
First thing need less to say that during the time between I-44 and I-49, vessel must be complying with the discharge criteria as per MARPOL annex I.
For the entries, the times mentioned in I-44 and I-49 should be the ship’s local time. This is simply because we are writing the date as per ship’s time, so time should also be corresponding to that.
If you are wondering what if there is a date change between the time as per I-44 and I-49. This can never happen because we are not supposed to discharge water to the sea during dark hours.
There is sometime a huge confusion about I-47 and I-48.
I-47: Bulk quantity discharged in m3 and rate of discharge in M3/Hr
I-48: Final quantity discharged in M3 and rate of discharge in M3/Hr
This concept assumes that the discharge of water to the sea will be in two stages.
In first stage the water is pumped out through ODME with higher discharge rate.
As the oil/water interface aprroaches, discharge rate is lowered to avoid the churning of the oil/water interface.
Under I-47, we need to record the quantity discharged and rate achieved during first stage.
Under I-48, we need to record the quantity discharged and rate achieved during second stage.
There can be instance when we would stop ODME and thus discharge of water manually without reducing the discharge rate.
In this case we can write “NA” under item I-48.
5. Missed Entry
What if you have missed an entry ? Let us say you missed to make an entry for cargo discharged at Kochi on 16th March 2017.
In this case you can use code O to make that entry.
So how do we do that ? Have a look at this entry.
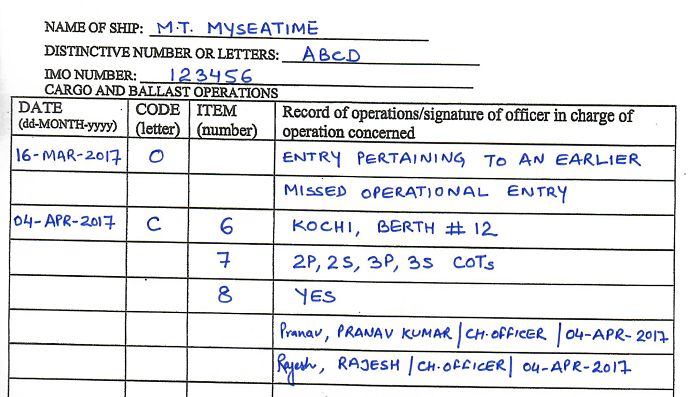
In this entry, the date corresponding to Code “O” is the date when the operation was carried out. The date corresponding to the missed entry (in this case code C) is the date when the entry is now being made in the oil record book.
You would have noticed that there are two signatures at end of this entry.
The first signature is for the person making “O” entry. And the second signature is for the person making the missing entry (C in this case).
The person making the “O” entry could be the master. It could also be the relieving chief officer who detected the missed entry.
The same chief officer should not be making both these entries, simply to have a check on such entries which are exceptional in nature.
Having a way to record a missed entry does not give the license to frequently miss the entry.
Conclusion
Oil record book is one of the most important document that chief officer has to maintain.
False, missed or incorrect entries are considered a serious offense worldwide. This makes it so much important to have the knowledge of making the correct oil record book entries.
Related Post: A step by step guide of how to operate ODME and principle of its operation
Infographic: A Quick Guide to Forthcoming Shipping Regulations

In the next few years, there are quite a few important shipping regulations that will enter in force.
Apart from these regulation, Maritime safety committee of IMO has introduced “four years cycle” for entry in force for all the SOLAS amendments.
What is “Four year Cycle”
The first four year cycle will start from 01st January 2016 to 01st January 2020.
Any amendment to the SOLAS , that is adopted before 1 July 2018 (18 months before the end of four year cycle), will enter into force on 01st Jan 2020.
The “Four year cycle” is developed to have a harmonised dates for implementation of the SOLAS amendments.
Any amendment adopted after 01st July 2018 will enter into force in next four year cycle (01 Jan 2024).
The four year cycle need not be followed in exceptional circumstances.
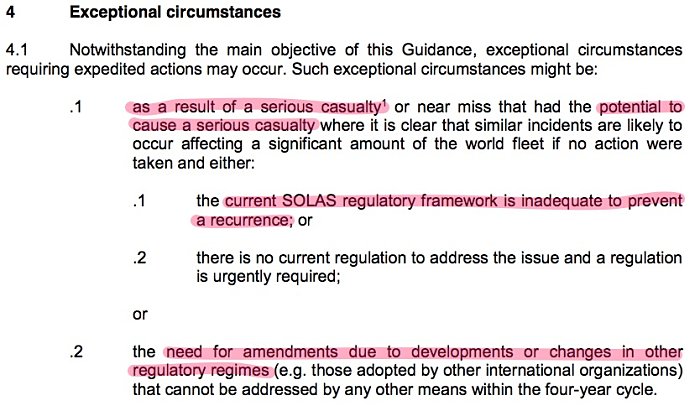
Apart from Four year cycle for SOLAS amendments, Let us have a look at main shipping regulations coming in force after 01 Jan 2017.

Conclusion
Shipping regulations are being drafted, adopted and entering in force each day. Sometimes it is tough to keep a track of these.
This infographic aims to highlight key shipping regulations entering in force in near future.